Welcome to the Samras Bigcommerce Theme Manual!
Thank you for choosing our BigCommerce theme. This documentation is designed to help you quickly understand, customize, and get the most out of your theme — whether you're setting it up for the first time or fine-tuning advanced features.
Inside, you’ll find step-by-step guides, configuration tips, and best practices to help you build a fast, scalable, and conversion-ready storefront.
Let's get started and make your online store shine!
Theme Support
We're here to help you get the best experience from your theme. This support section explains how to get assistance, what’s included in theme support, and how to resolve common issues efficiently.
What Our Theme Support Covers
Our support team can help you with:
- Theme installation and setup
- Theme settings and configuration
- Built-in features and functionality
- Layout and styling options available within the theme
- Fixes for theme-related bugs or issues
- Guidance on using Page Builder sections and widgets
- Compatibility with the latest BigCommerce updates
If something doesn't look or behave as expected within the theme's default functionality, we're happy to assist.
What Theme Support Does Not Cover
While we aim to be as helpful as possible, theme support does not include:
- Custom feature development
- Extensive CSS or JavaScript customization
- Third-party app issues or conflicts
- Custom checkout modifications
- Custom API or backend development
- Issues caused by external scripts or heavily modified theme files
For advanced customizations, we recommend working with a BigCommerce developer or agency.
Before Contacting Support
To help us resolve your issue faster, please try the following:
- Review the relevant documentation section
- Clear your browser cache and refresh the page
- Test the issue in a private/incognito browser window
- Temporarily disable third-party apps (if applicable)
- Ensure your theme is updated to the latest version
Many common issues can be resolved quickly using these steps.
How to Contact Support
When reaching out for support, please include:
- Your BigCommerce store URL
- Theme name and version
- A clear description of the issue
- Steps to reproduce the problem
- Screenshots or screen recordings (if possible)
Providing these details helps us understand and resolve your request more efficiently.
Theme Settings & Customization
Theme Features
Header Settings
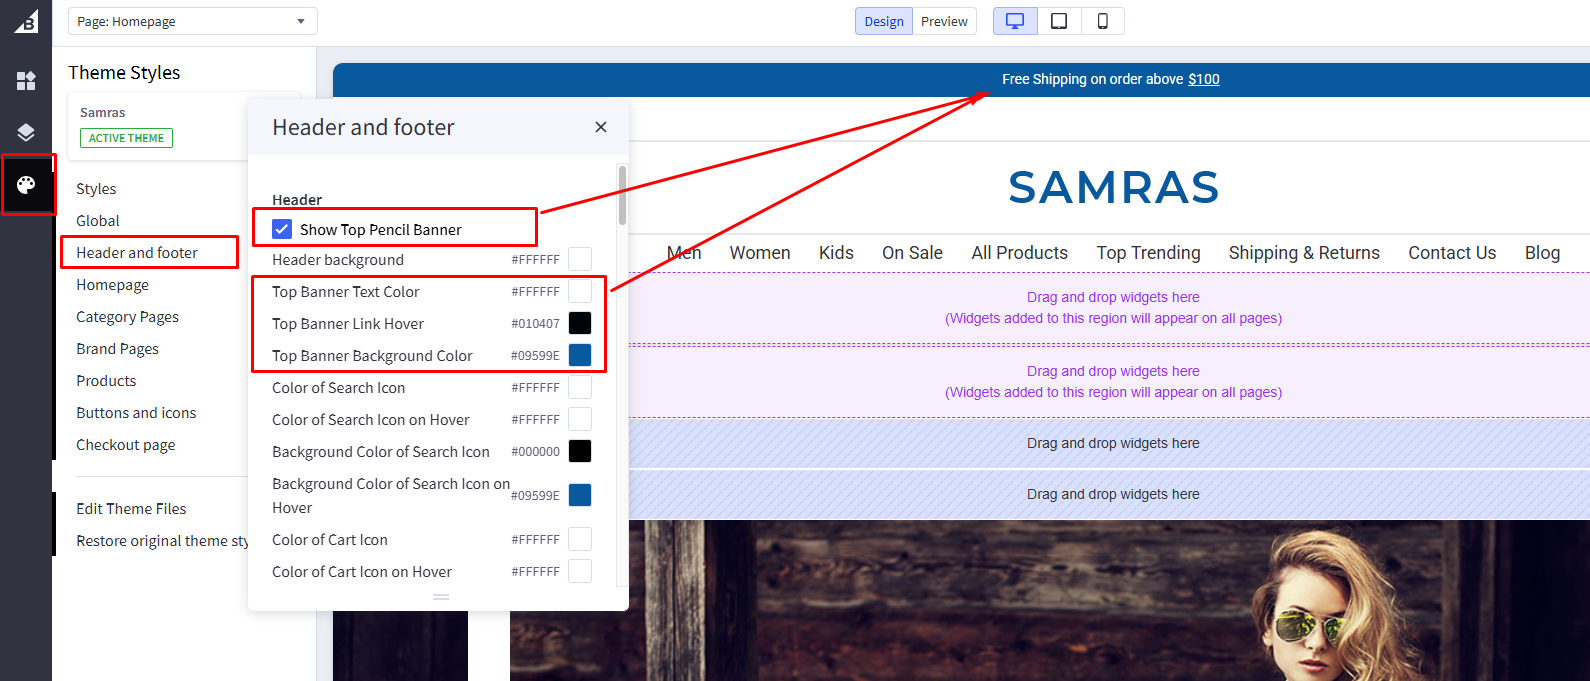
1. Header Pencil Banner

"Free Shipping on order above $100"
The Pencil Banner is a static text banner displayed across the site. We have provided a theme setting that allows you to enable or disable this banner. You can also update the banner text and link using the en.json language file.
Below are the steps to enable/disable the banner and update its text or link :
Enable or Disable the Pencil Banner
- Go to BigCommerce Admin → Storefront → Themes
- Click Customize on the active theme
- Navigate to Theme Style
- Locate Header & Footer setting and the Pencil Banner option
- Toggle the setting to Enable or Disable or Color changes
- Click publish
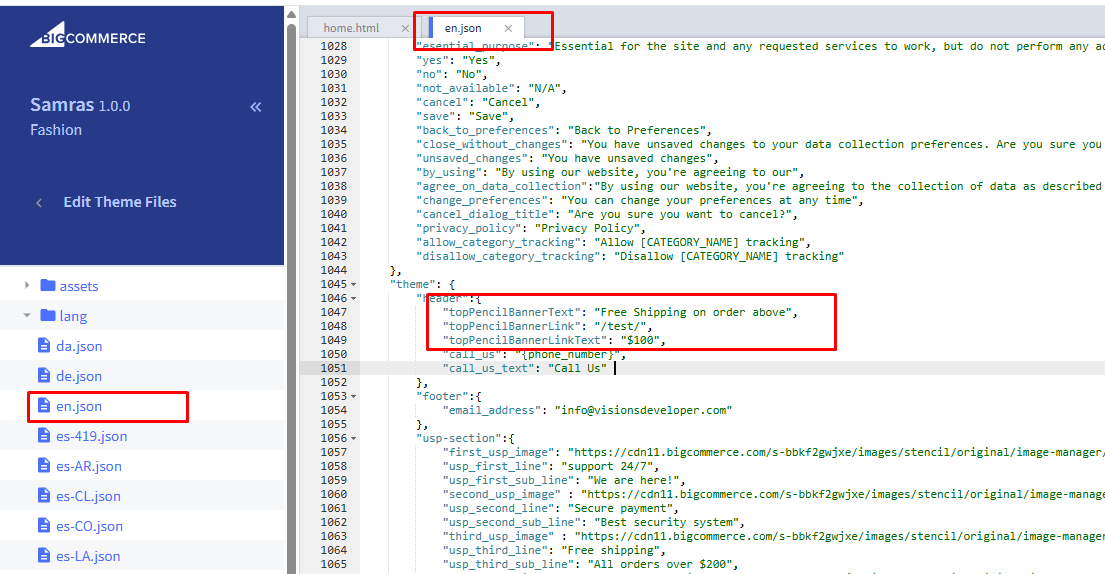
Pencil Banner Text or Link
- Go to Storefront → My Themes
- Click Advanced → Edit Theme Files
- Open the language file: lang/en.json
- Locate the Pencil Banner text
- Update the text and link as required
- Click on Save & apply file.
2. Logo Position & Header Alignment
The logo supports three positions: Left, Center, and Right. Each logo position comes with a unique header alignment, allowing you to choose the layout that best matches your preferred design.
Change Logo Position
- Go to BigCommerce Admin → Storefront → Themes
- Click Customize on the active theme
- Navigate to Theme Style
- Locate Header & Footer setting and the Logo Position option
- Select the desired logo position (Left, Center, or Right) & Also other settings for logo
- Click publish
How Header Layout Changes
Left Logo Position
Center Logo Position
Right Logo Position
Recommended Image Size:
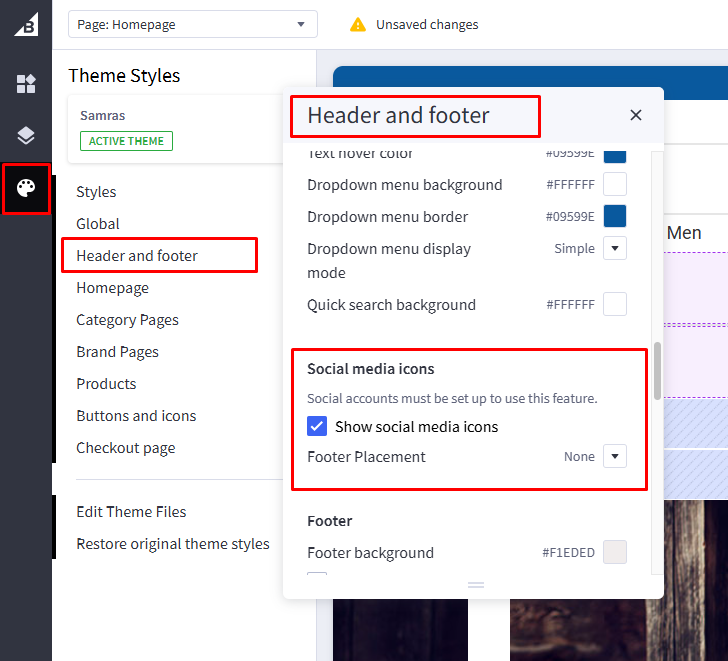
3. Header Social icon
There is an option to enable social icons in both the header and footer. When this setting is enabled, social icons will be displayed in the header and footer areas of the theme. Please follow the steps below to configure this option.
- Go to BigCommerce Admin → Storefront → Themes.
- Click Customize on the active theme.
- Navigate to Theme Styles.
- Locate the Header & Footer settings and find Show Social Media Icons.
- Enable the checkbox to display social media icons in the header and footer.
- You can also change the placement of the social media icons in the footer.
- Click Publish to save your changes.
If social icons are disabled, the wishlist and gift certificate icons will be displayed in the header. If the wishlist and gift certificate options are also disabled from the admin settings, no icons will appear in that section of the header.
4. Header Search & Cart Icon & Functionality
You can now customize the search and cart icons by changing their icon color and background color from the theme settings.
5. Navigation Menu / Header Navigation
There are three types of navigation menu designs: Simple, Alternate, and Mega Menu. You can change the menu layout from the theme settings. Please refer to the design section and follow the steps provided to update the menu layout.
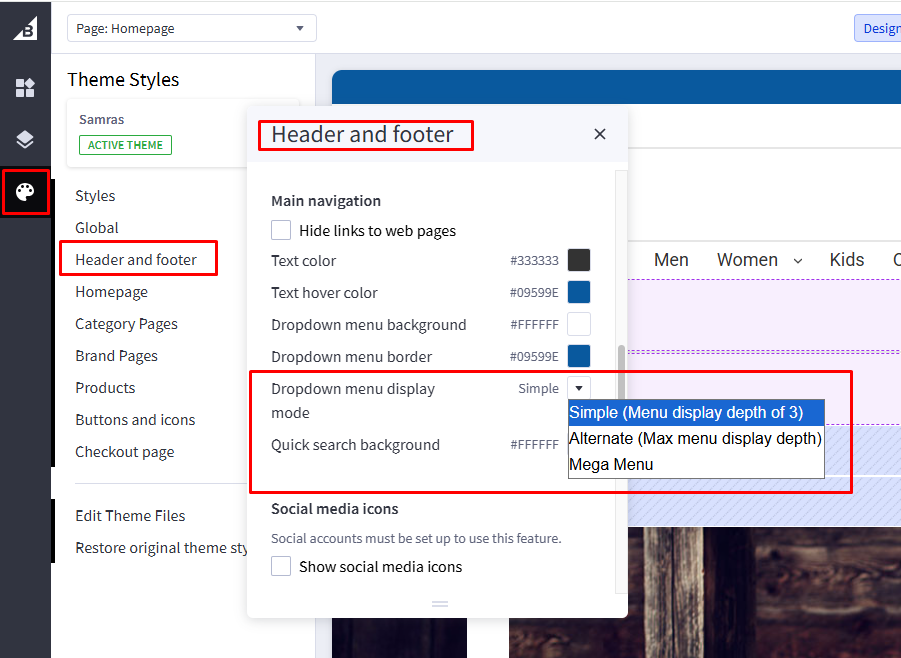
- Go to BigCommerce Admin → Storefront → Themes.
- Click Customize on the active theme.
- Navigate to Theme Styles.
- Locate the Header & Footer settings and find Main navigation.
- Select the desired navigation type (Simple, Alternate, or Mega Menu) from Dropdown menu display mode.
- Click Publish to save your changes.
Main Navigation Styles
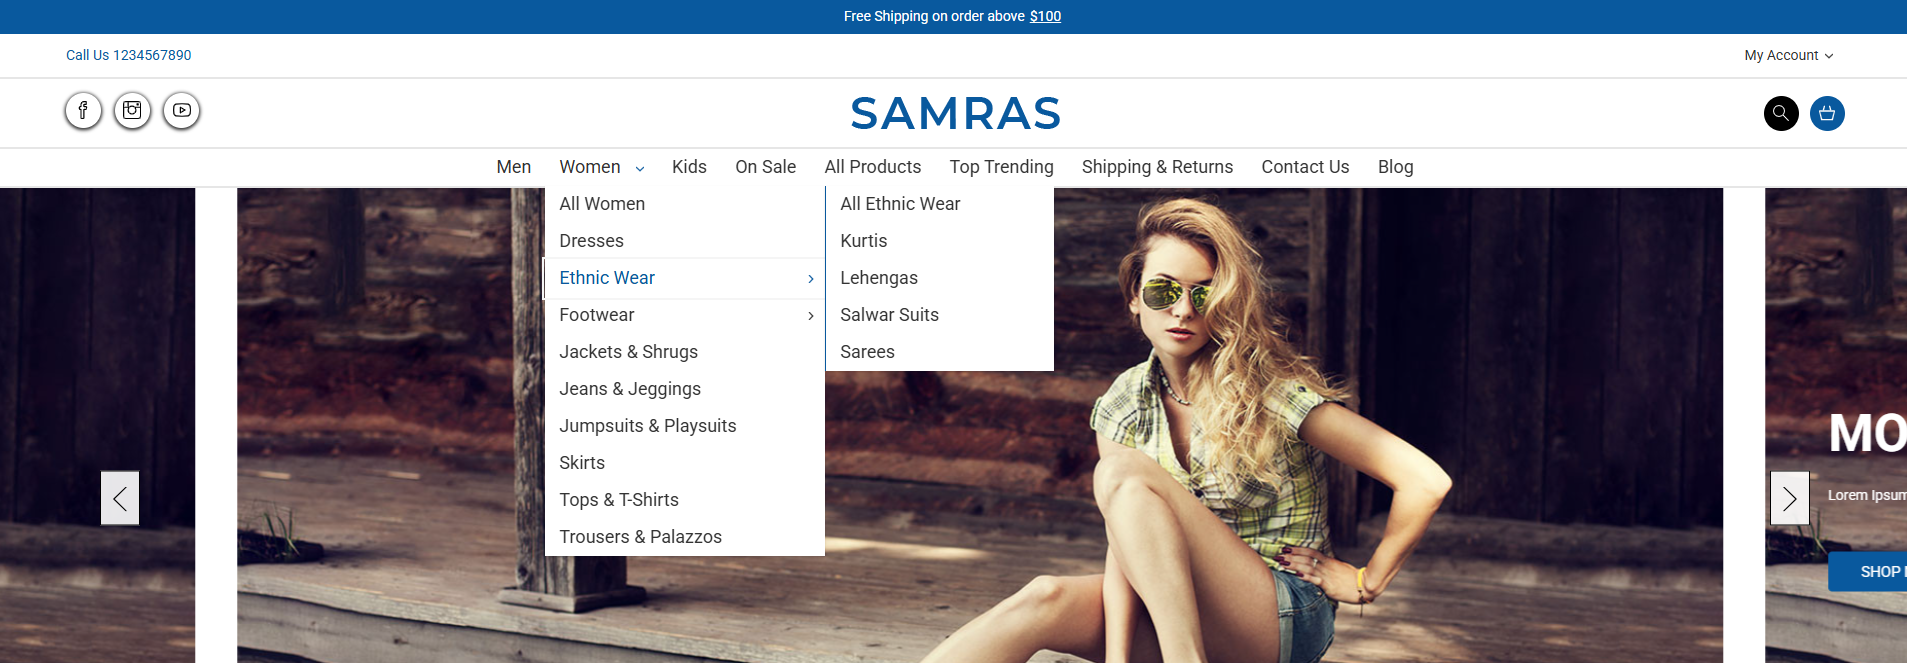
Simple Navigation
Alternate Navigation
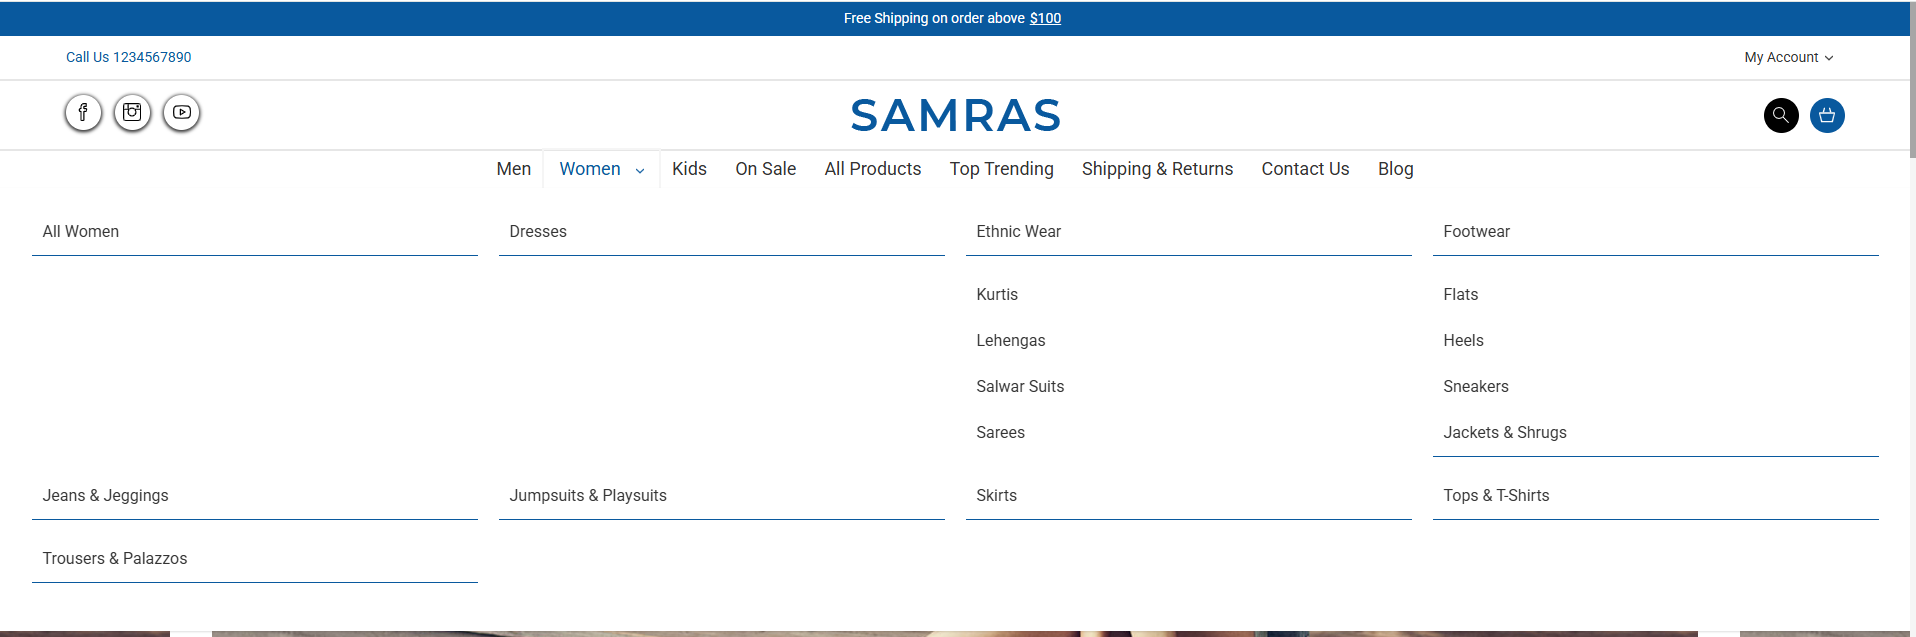
Mega Menu Navigation
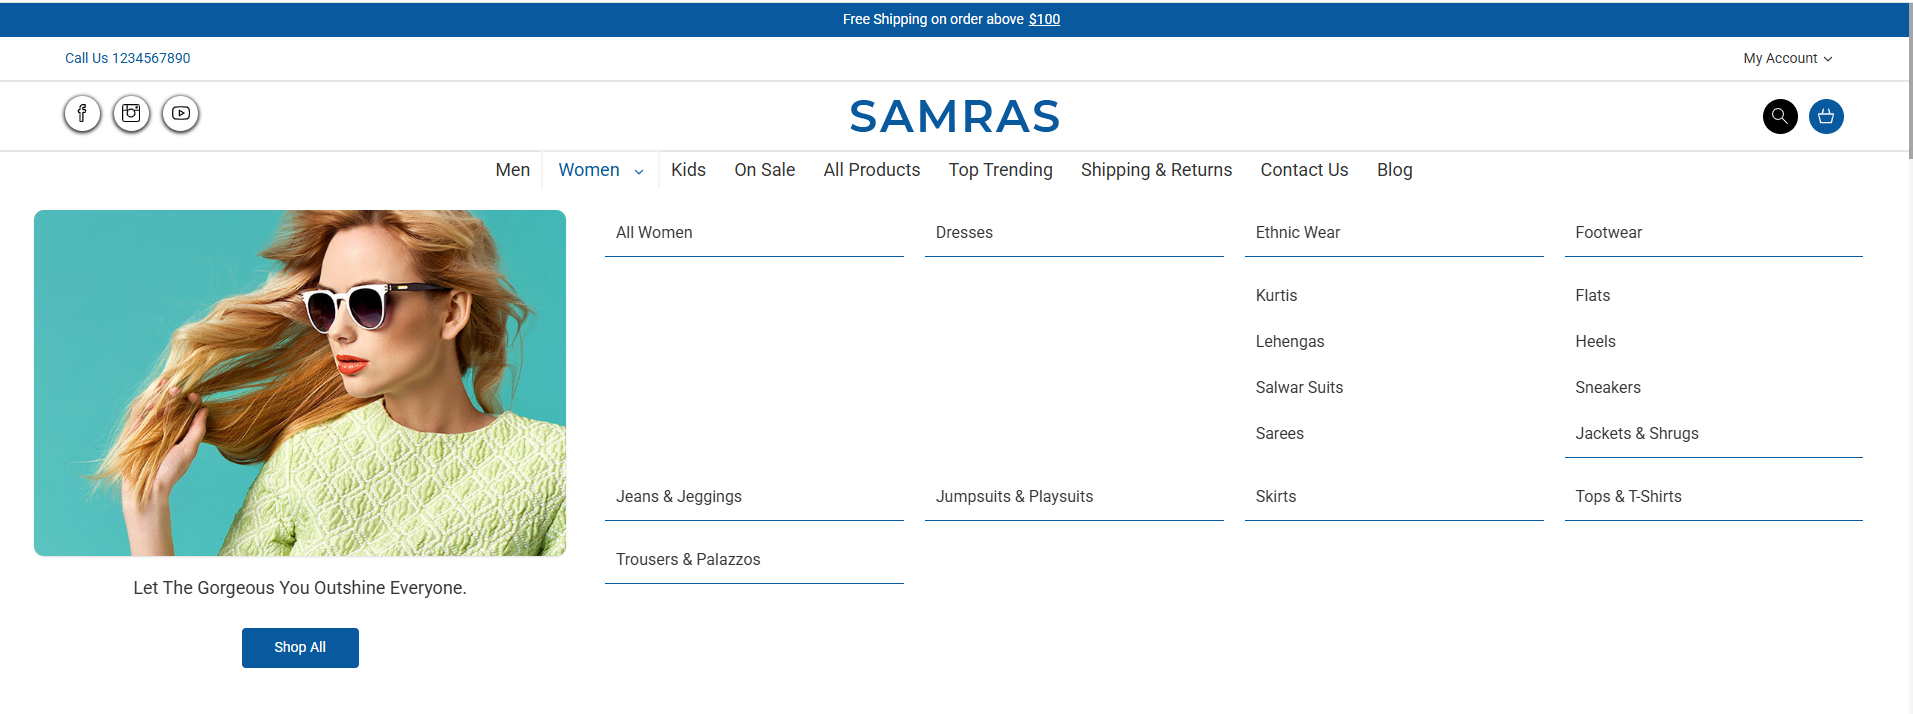
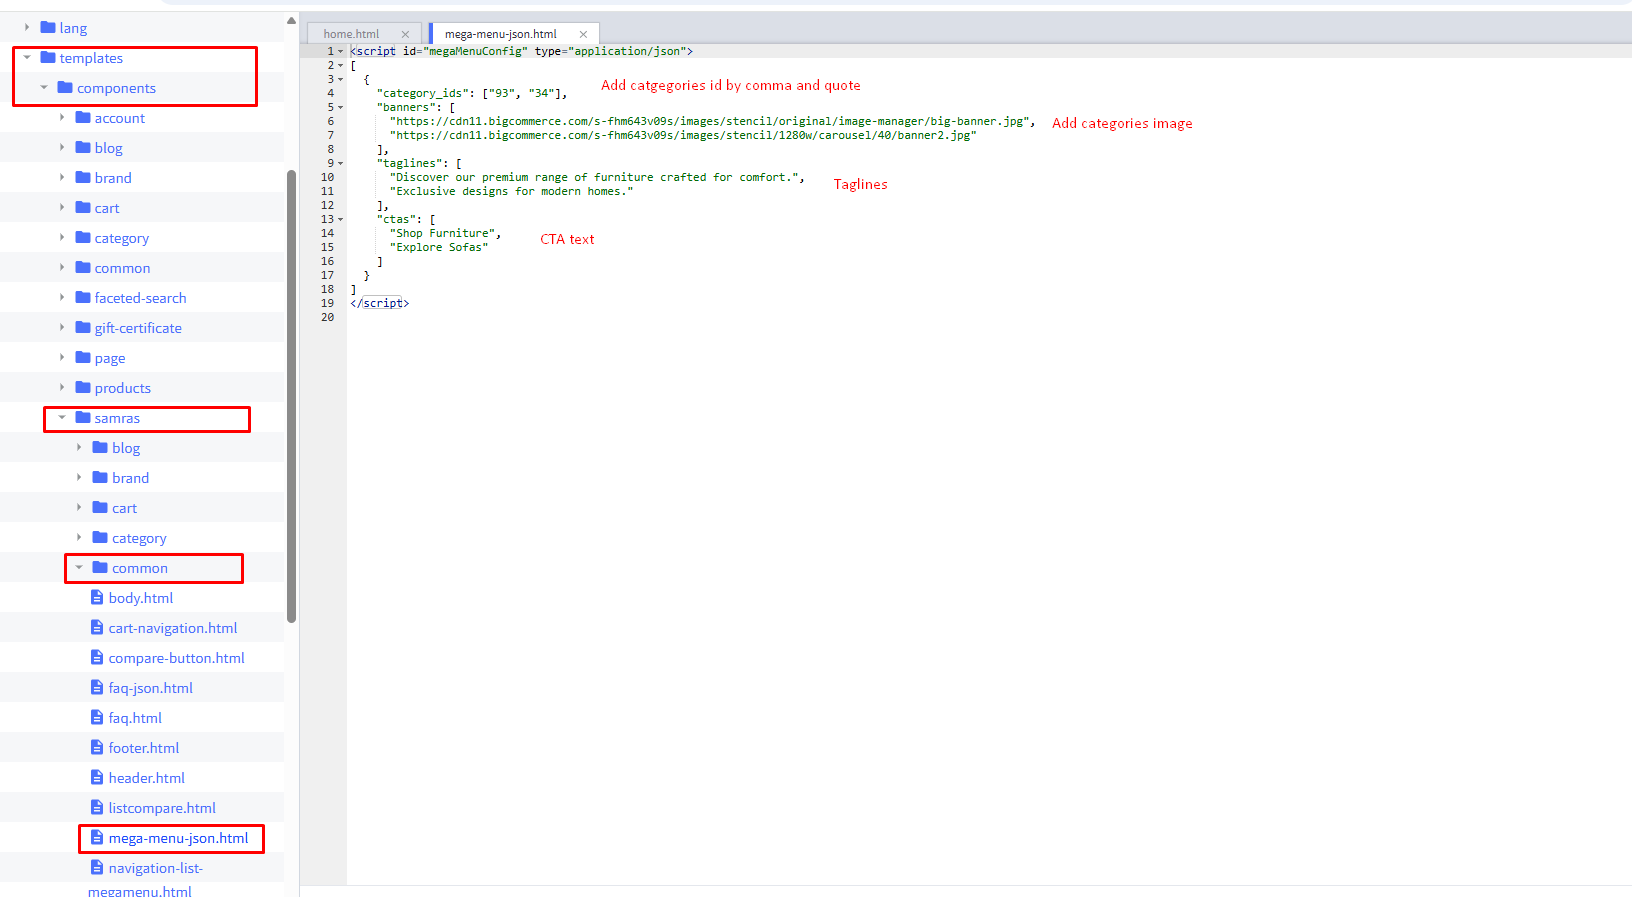
Mega Menu - Category Image, Tagline & Button
To configure this feature, you need to:
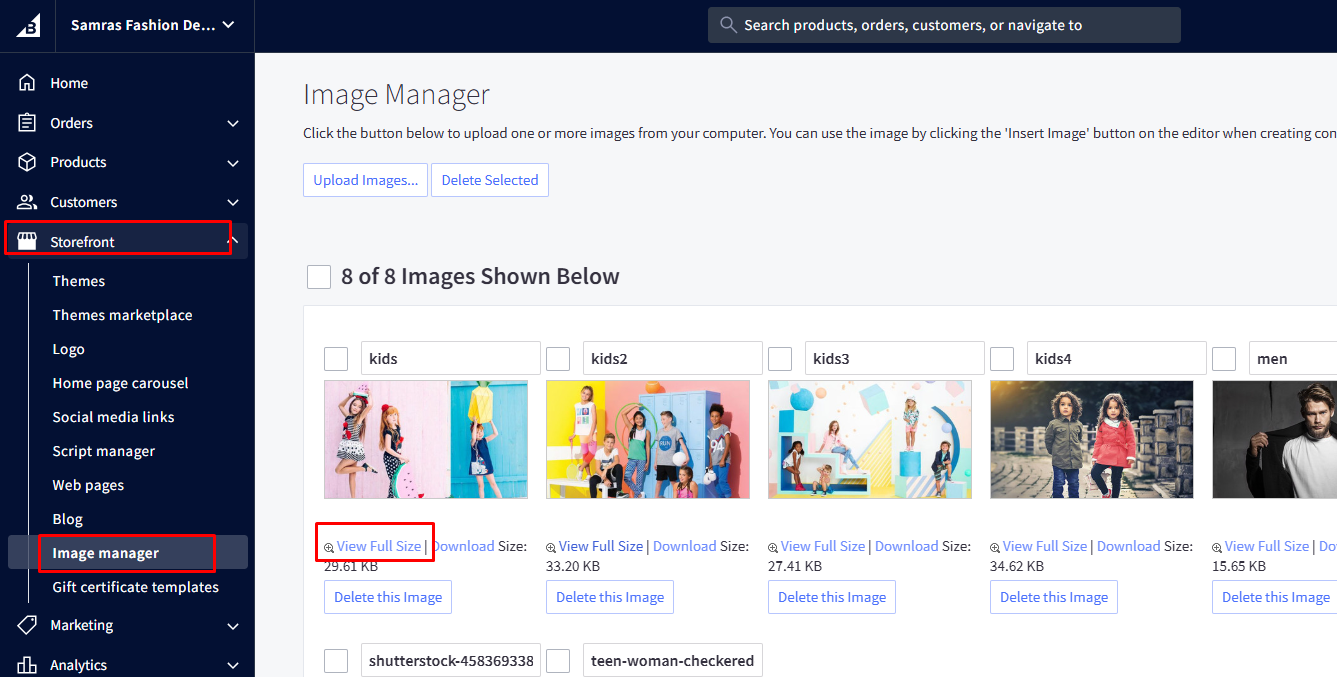
- Add the category ID (Check below image)
- Upload an image using the Image Manager
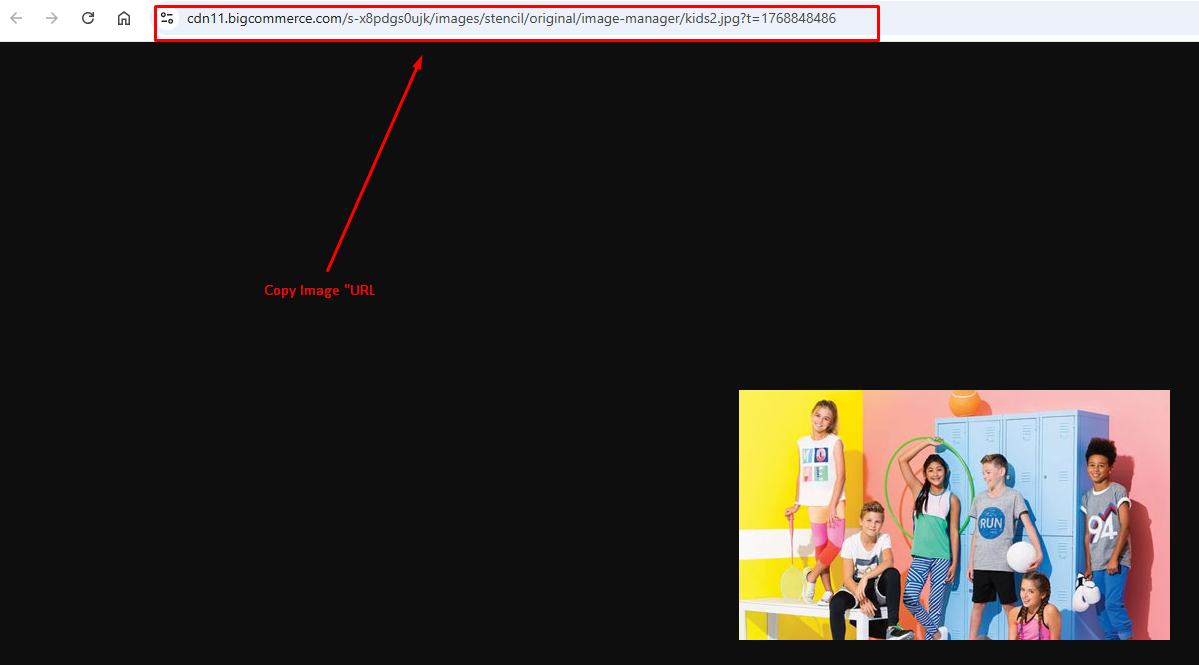
- Provide the image URL (Image URL)
- Set a unique tagline for each category
- Define a custom button text, which links to the parent category
- Follow the steps below to manage the Mega Menu content:
Follow the steps:
- Go to Storefront → My Themes.
- Click Advanced → Edit Theme Files.
- Open the file located at templates/components/samras/common/mega-menu-json.html.
- Add the category ID, image URL, tagline, and button text in the specified format.
- Click Save & Apply to publish the changes.
Recommended Image Size:
Footer Settings
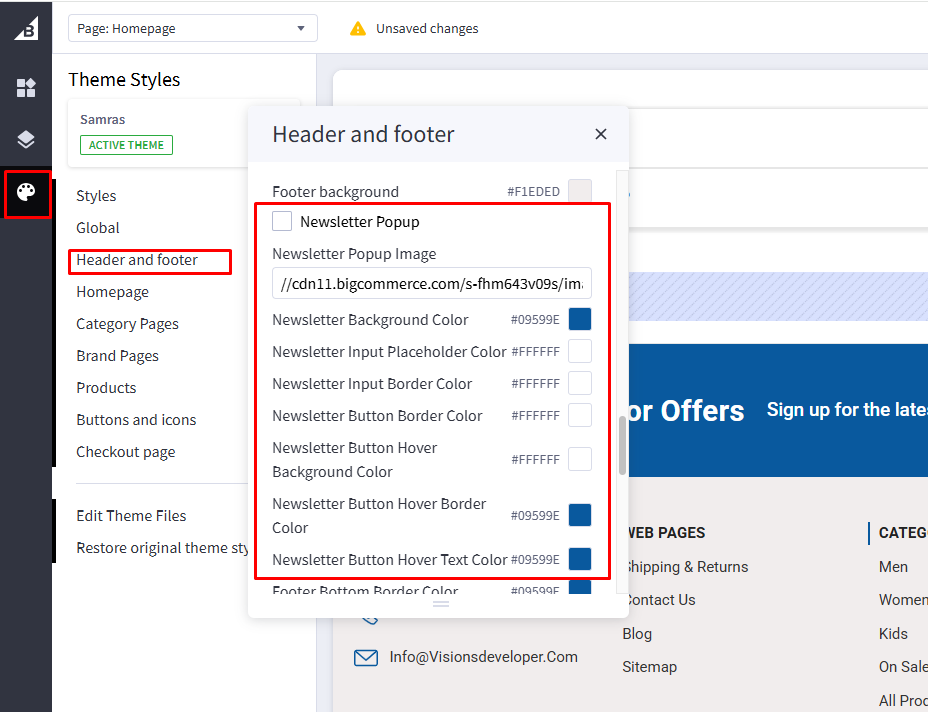
1. Newsletter popup and settings
There is a display setting that allows you to enable or disable the newsletter popup. You can add an image to the newsletter popup from the Theme Editor and customize its appearance by changing the background color, text color, input fields, and button colors. The default BigCommerce newsletter popup can be disabled from the store admin settings.
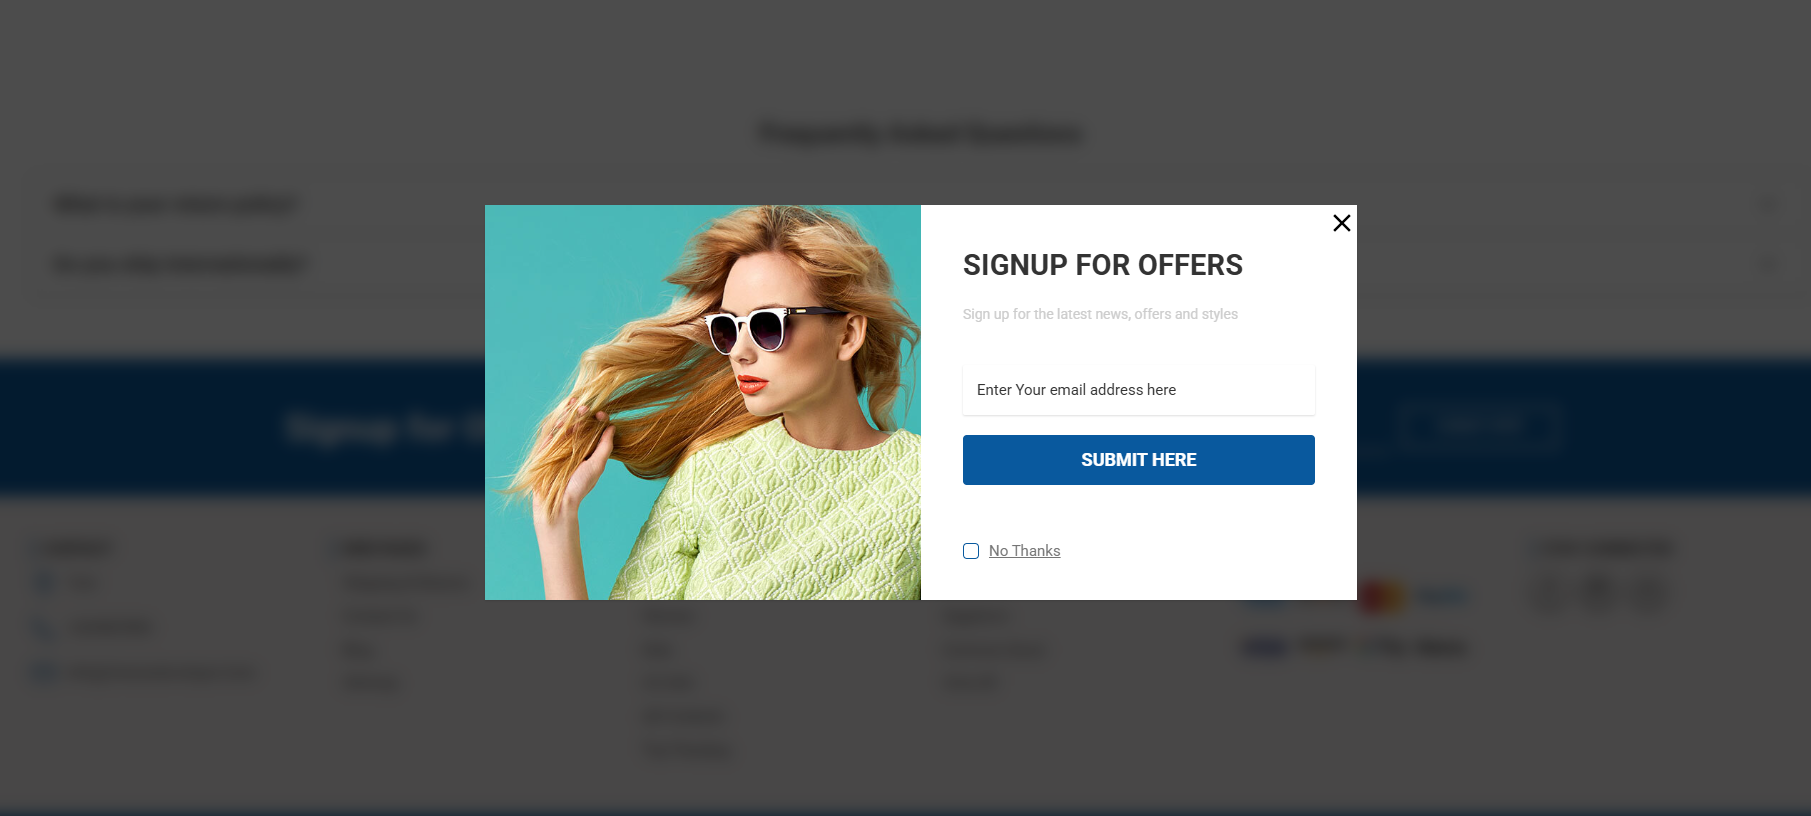
Recommended Image Size:
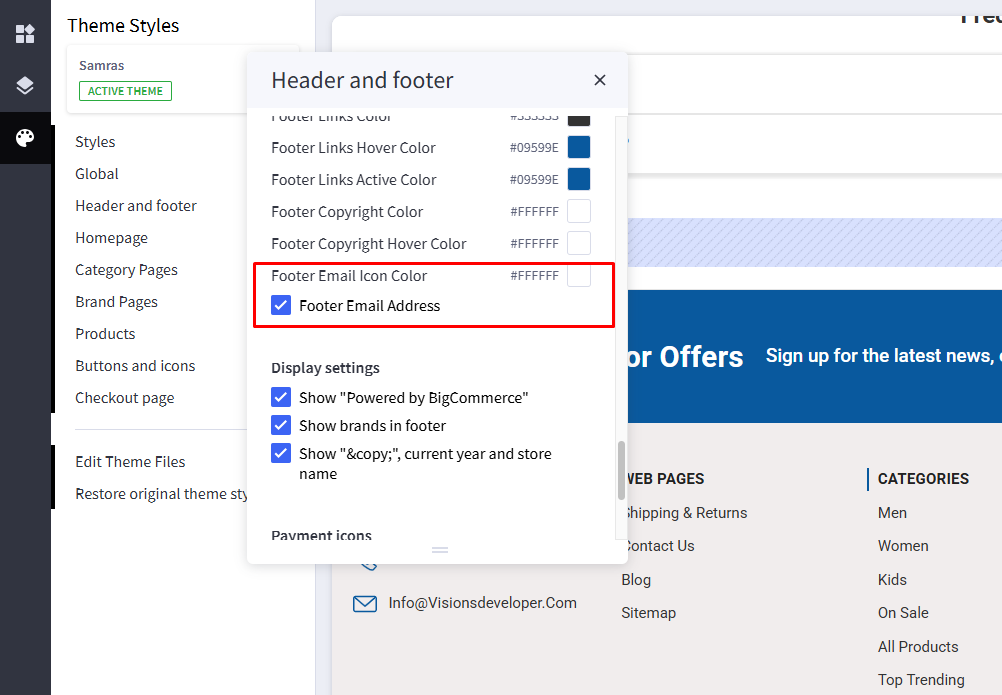
2. Email address settings
You can enable or disable the email ID from the theme settings. Please follow the steps below to configure this option.
- Go to Storefront → My Themes
- Click Advanced → Edit Theme Files
- Open the language file: lang/en.json
- Locate email id text
- Update the text
- Click on Save & apply file.
3. Payment, Copyright and social Icons
You can enable or disable the email ID from the theme settings. Please follow the steps below to configure this option.
- Go to Storefront → My Themes
- Click Advanced → Edit Theme Files
- Open the language file: lang/en.json
- Locate email id text
- Update the text
- Click on Save & apply file.
4. Address and Contact Information
The address and contact information can be managed from the Store Profile settings in the BigCommerce admin panel.
5. Footer links
Footer links are dynamic; however, you can customize their colors from the theme settings.

Home page settings
1. Hero Carousel
The homepage hero carousel is managed dynamically from the BigCommerce admin panel. You can refer to the official BigCommerce documentation for detailed instructions on how to manage carousel content.
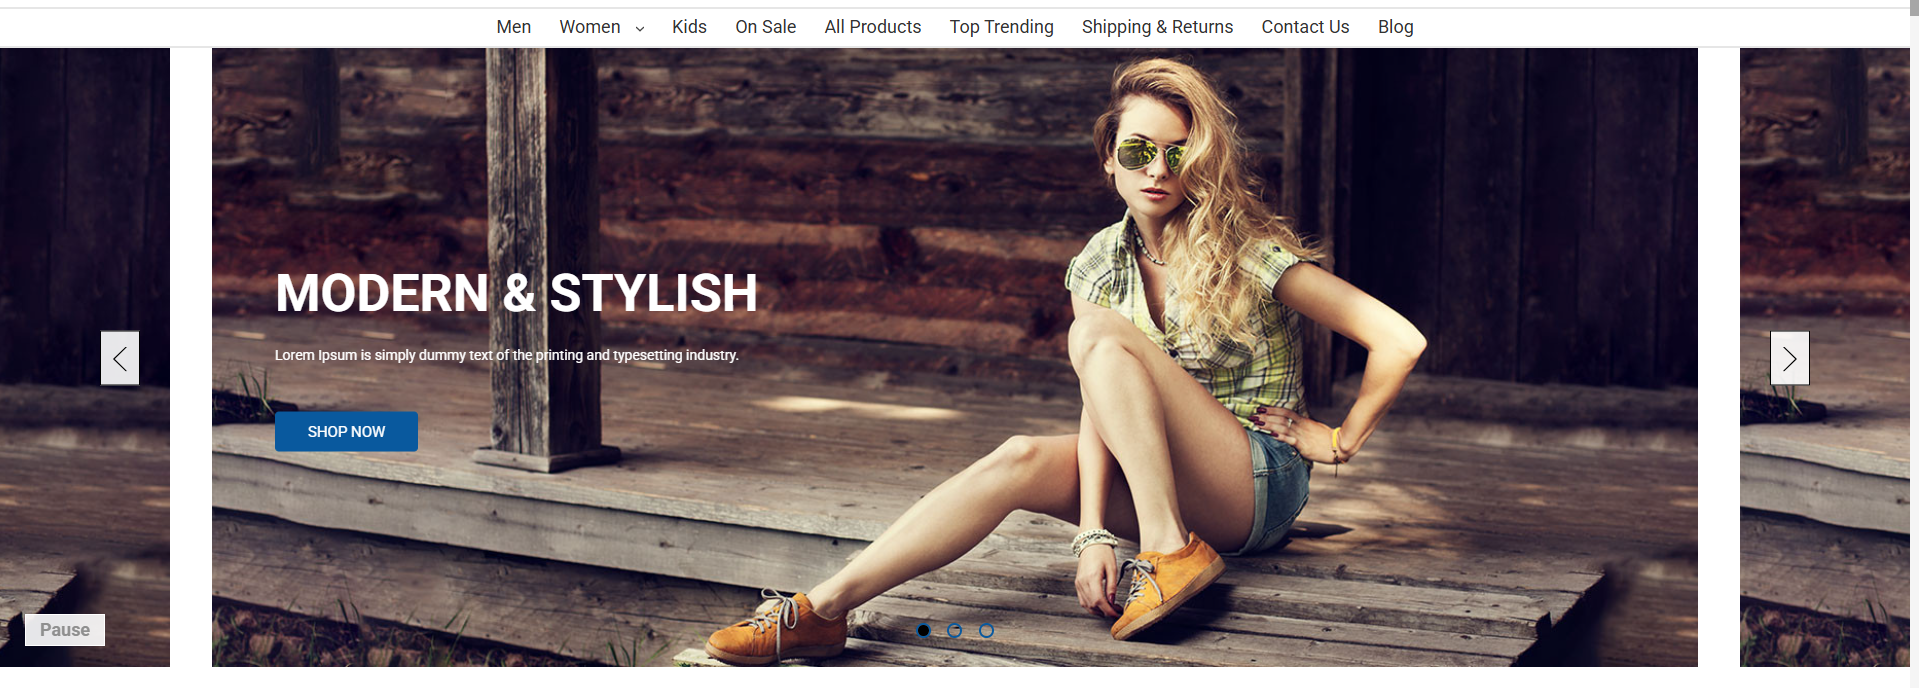
Recommended Image Size:
2. USP Section
The Unique Selling Proposition (USP) section can be enabled or disabled from the theme settings. Please follow the steps below to manage this option.

- Go to BigCommerce Admin → Storefront → Themes
- Click Customize on the active theme
- Navigate to Theme Style
- Locate Home page and USP Images
- Toggle the setting to Enable or Disable.
- Click publish
You can also update the USP images and text from the language file located at lang/en.json. Follow the steps provided to modify the content.

- Go to Storefront → My Themes
- Click Advanced → Edit Theme Files
- Open the language file: lang/en.json
- Locate theme → USP section
- Update the title, subtitle and images/icon as required
- Click on Save & apply file.
Recommended Image Size:
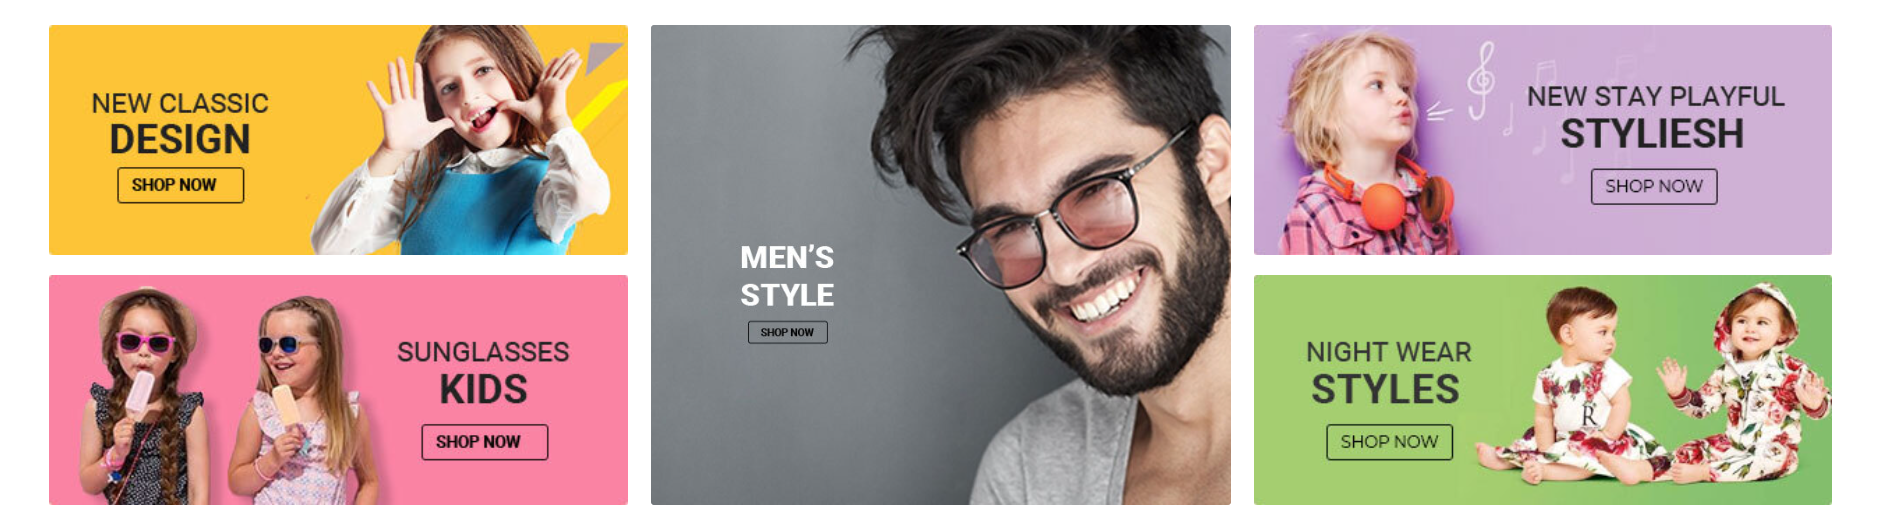
3. Home Category Banners
You can manage the Homepage Category Images section directly from the theme settings. This feature allows you to enable or disable the section, upload category images, and assign links to the corresponding category pages
- Go to Storefront → My Themes.
- Click Customize on the active theme.
- Navigate to the Homepage Category Images section in Theme Styles.
- Enable or disable the section using the display setting.
- Upload the category image or enter the image path in the provided field.
- Add the category link to redirect customers to the relevant category page.
- Click Publish to apply the changes.
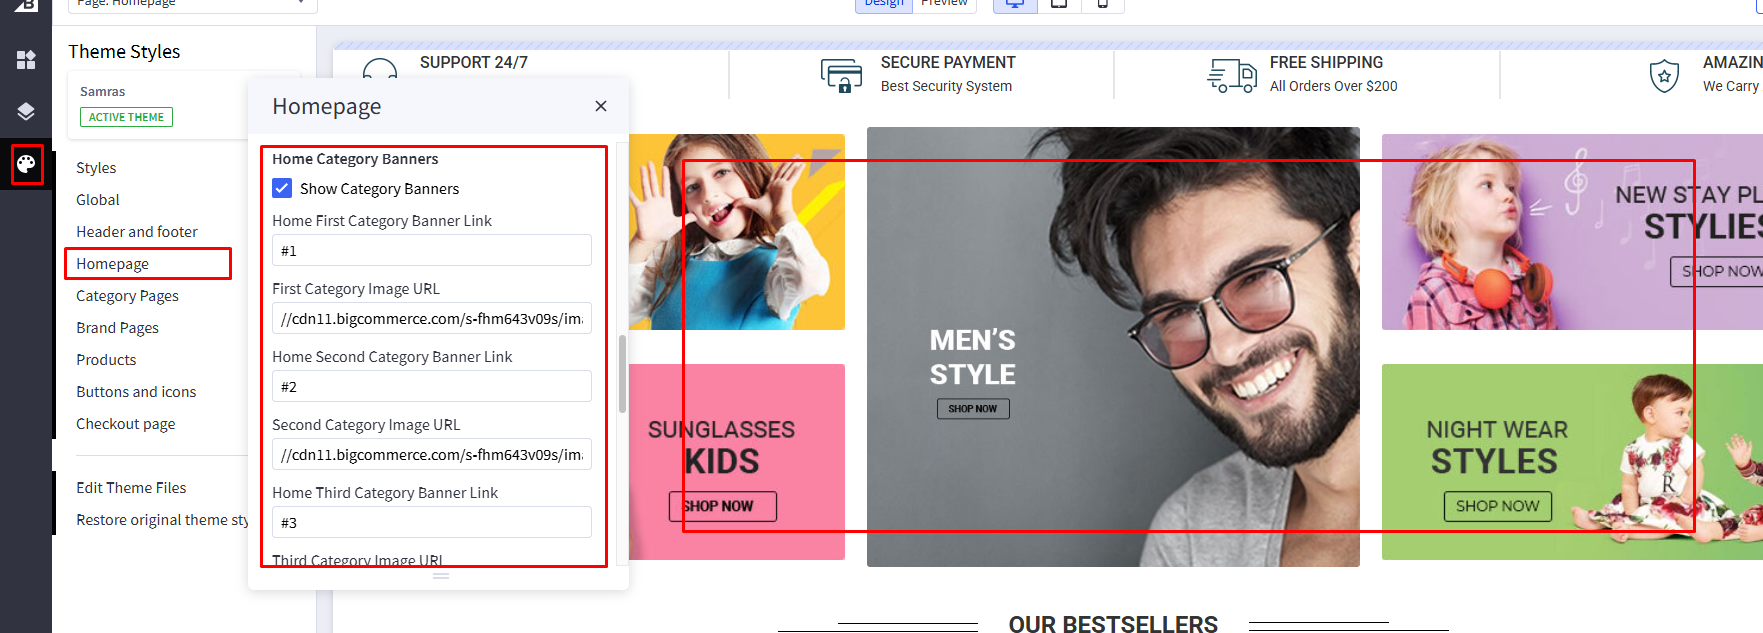
Recommended Image Size:
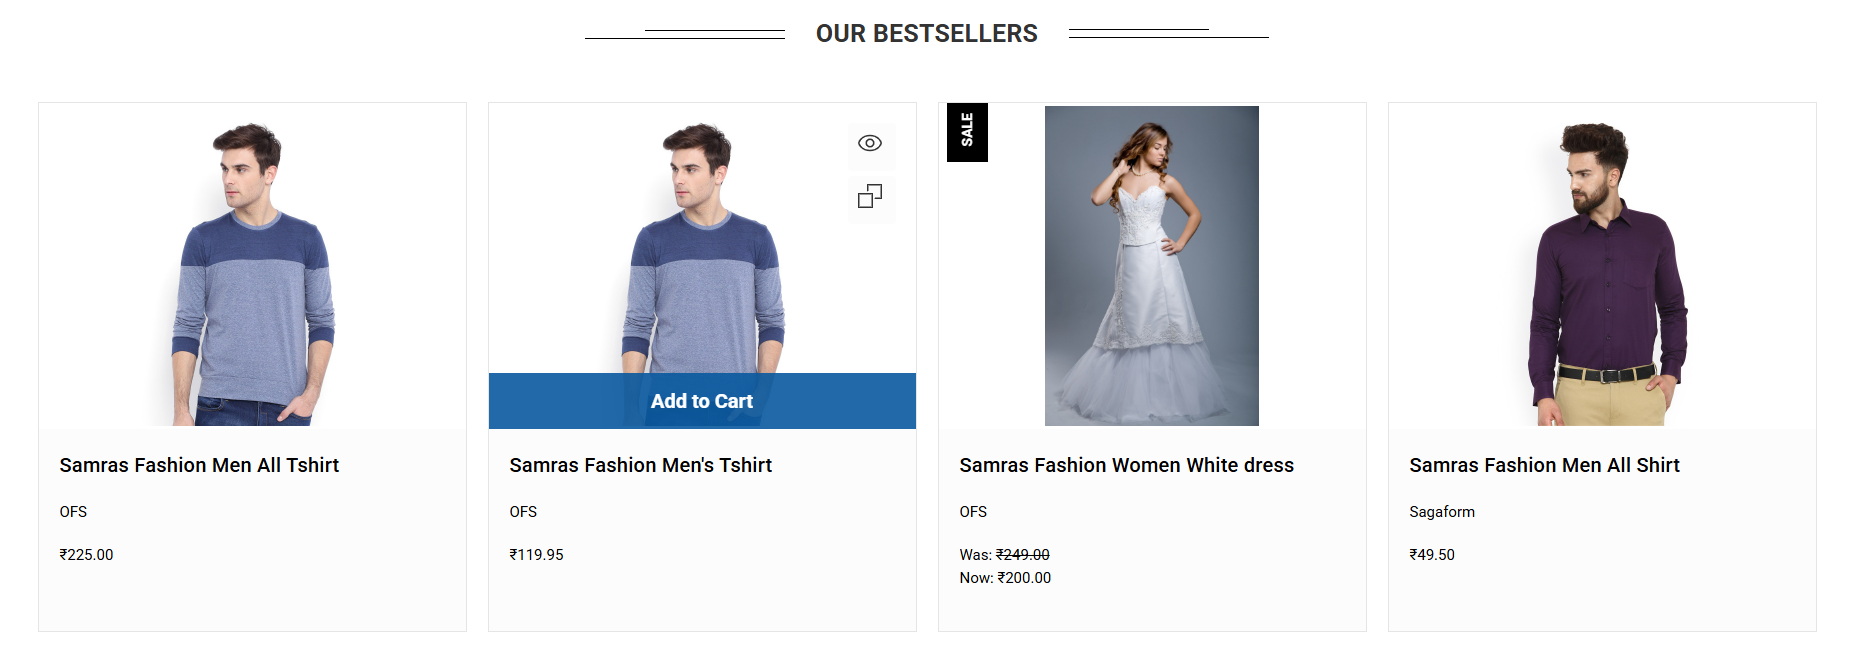
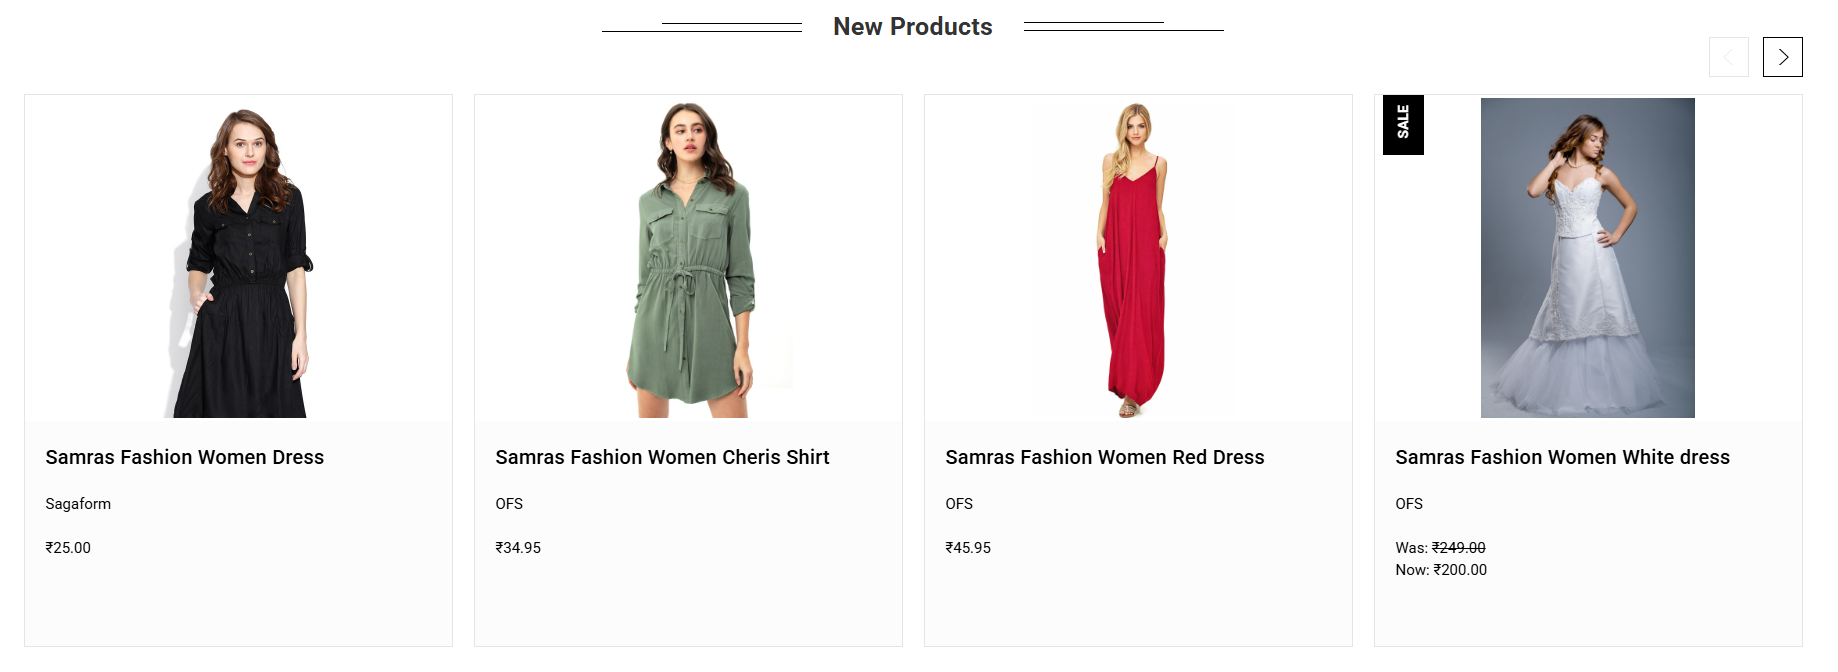
4. Our Best Sellers, Featured products and new products.
The Best Sellers, Featured Products, and New Products sections use the default BigCommerce functionality.
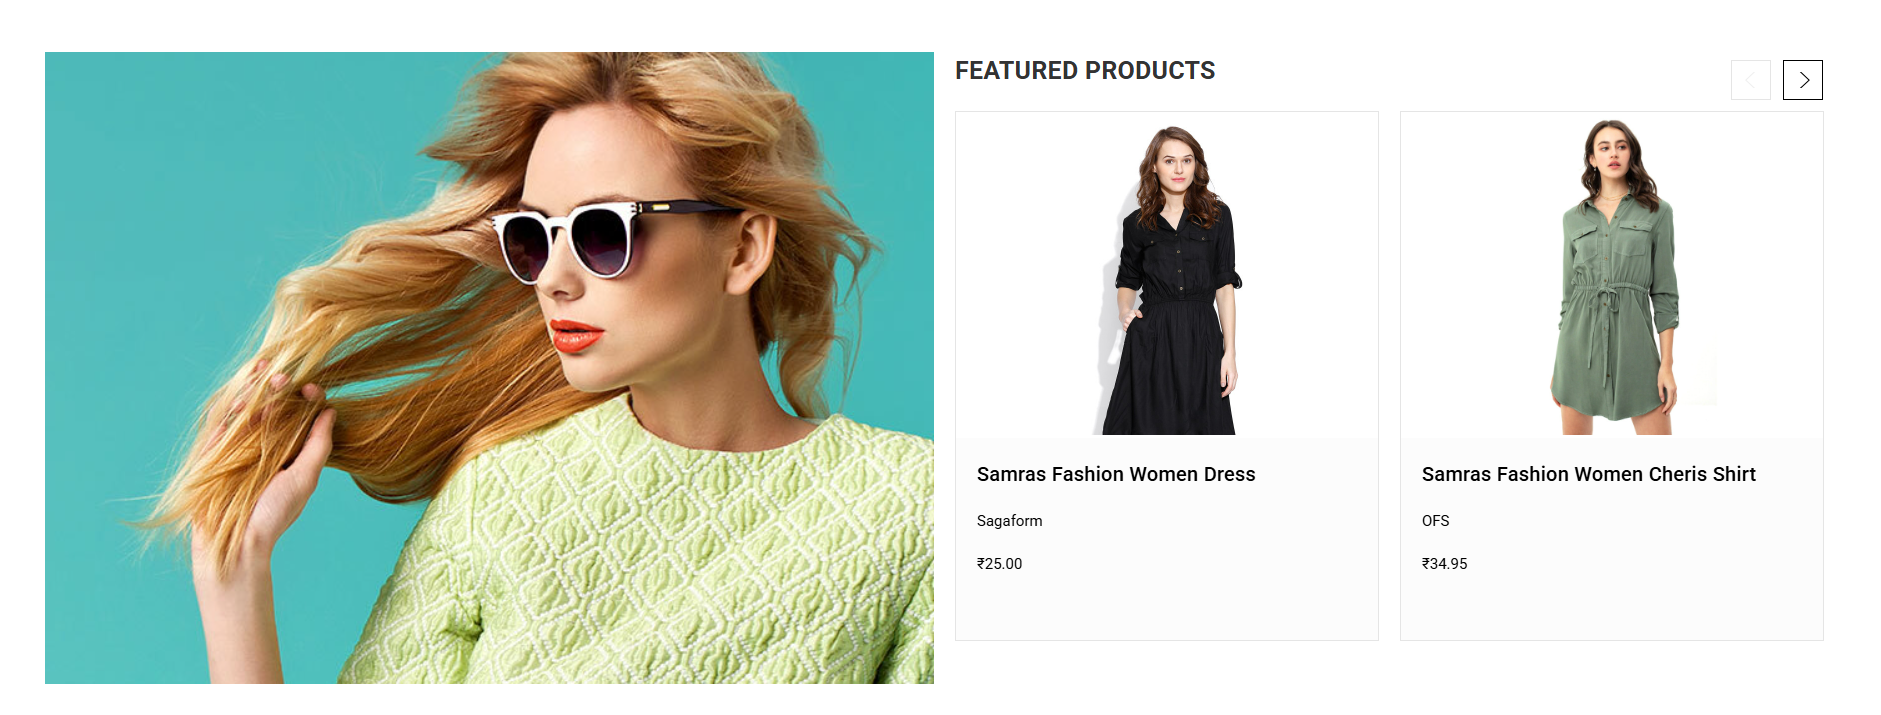
Featured products banner image
You can also add a banner image alongside the Featured Products section for promotional or visual enhancement purposes.
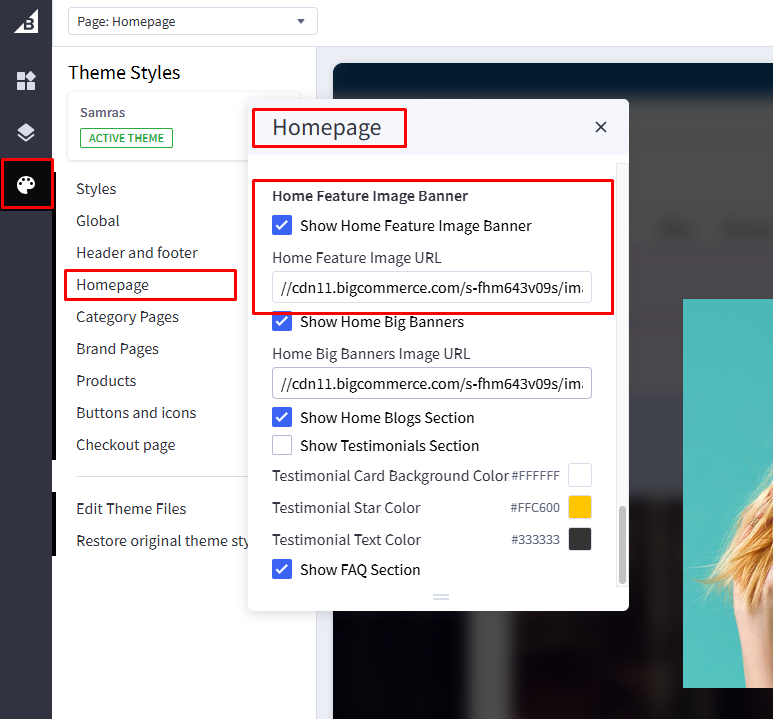
- Go to Storefront → My Themes.
- Click Customize on the active theme.
- Navigate to the Home Feature Image Banner section in Theme Styles.
- Enable or disable the section using the display setting.
- Upload the Home Feature Banner image or enter the image path in the provided field.
- Click Publish to apply the changes.
5. Home Big Banner
You can manage the Homepage Big Banner section directly from the theme settings. This feature allows you to enable or disable the section, upload a banner image, and assign a link to redirect customers to a specific page.
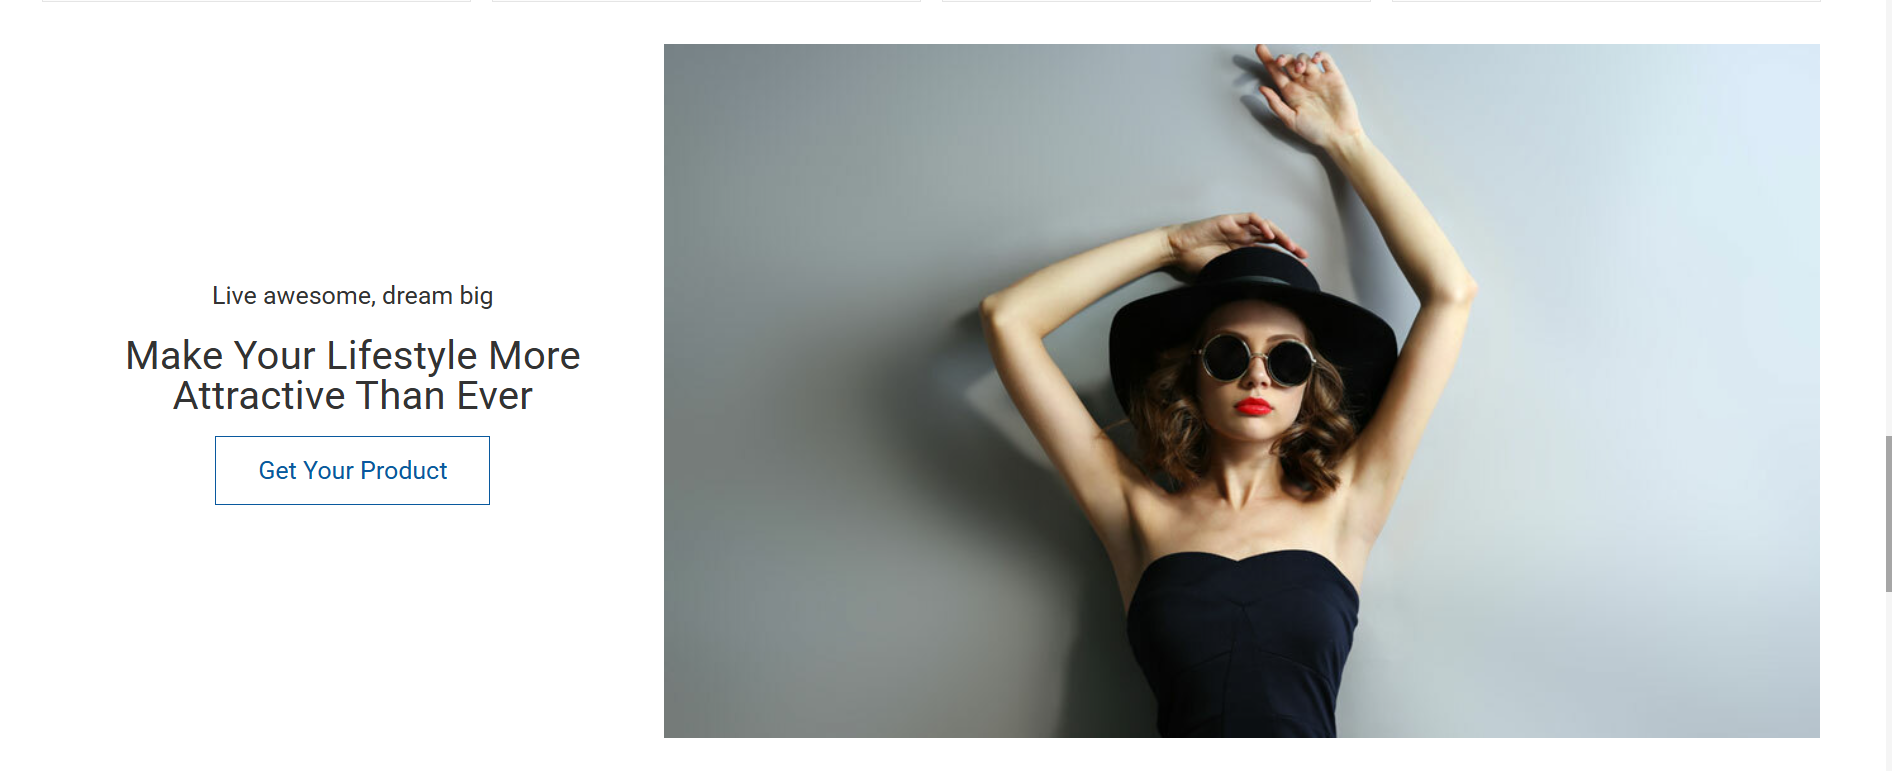
Home Big banner image
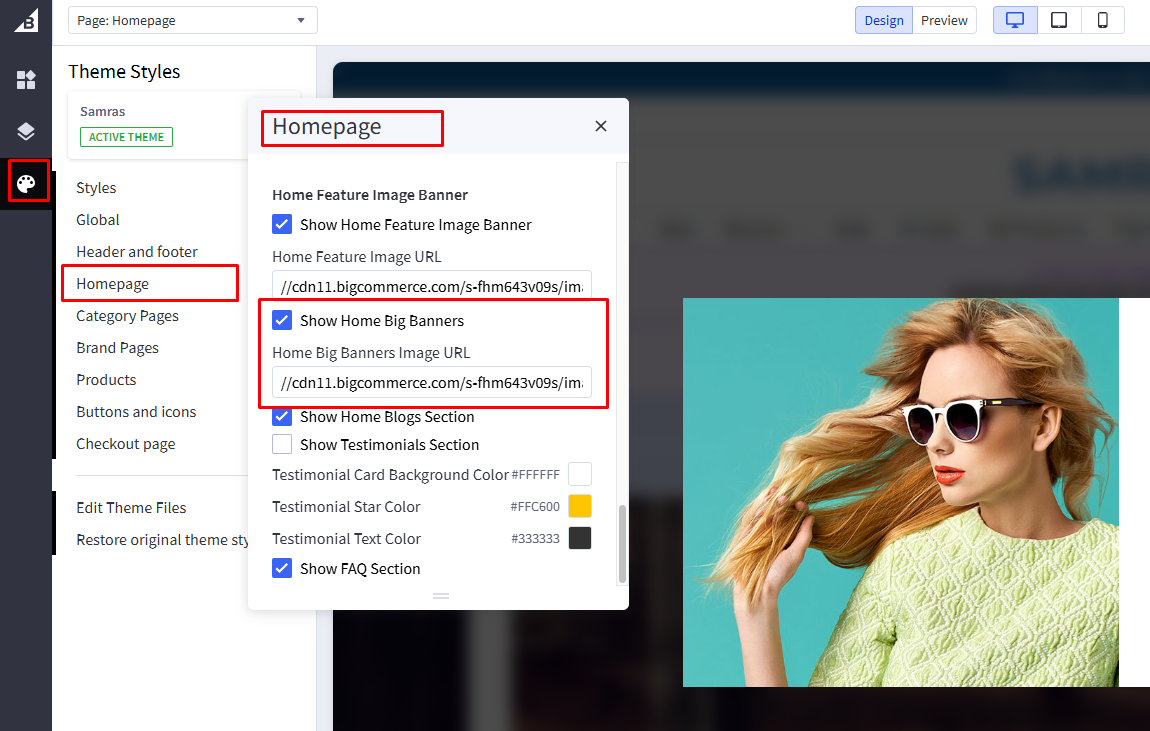
- Go to Storefront → My Themes.
- Click Customize on the active theme.
- Navigate to the Home Big Banner section in Theme Styles.
- Enable or disable the section using the display setting.
- Upload the Home Big Banner image or enter the image path in the provided field.
- Click Publish to apply the changes.
Home Big banner image text
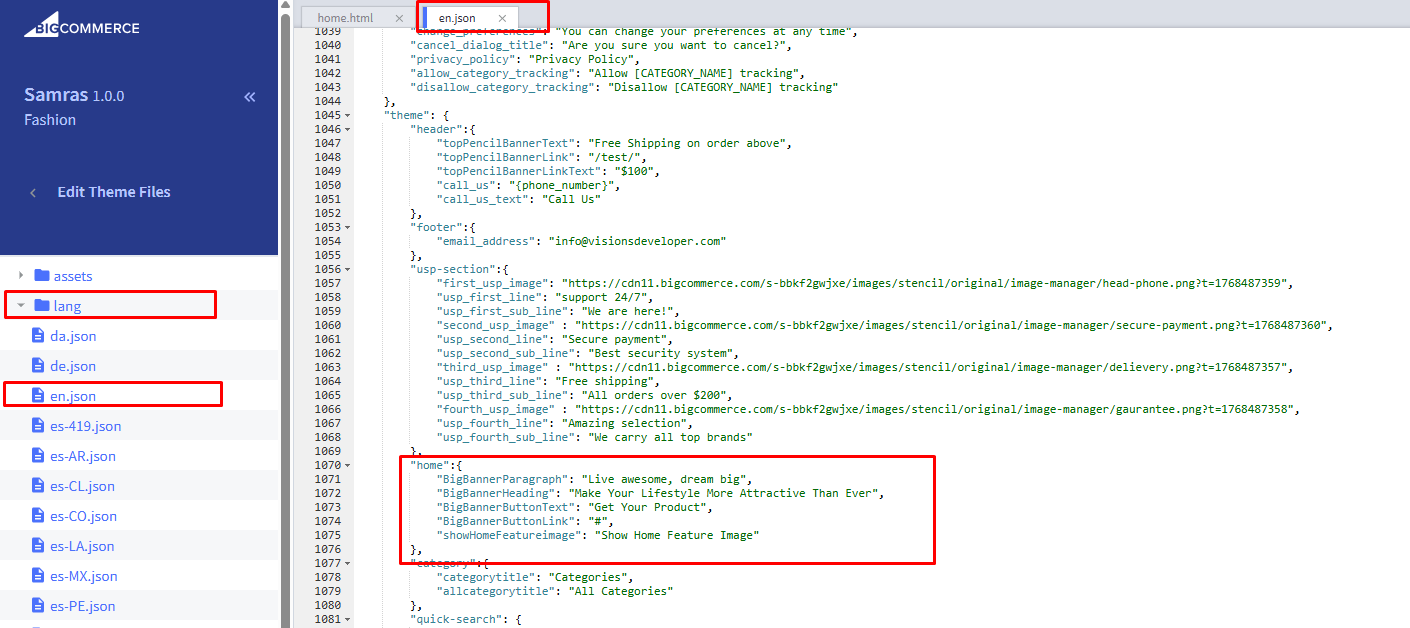
- Go to Storefront → My Themes
- Click Advanced → Edit Theme Files
- Open the language file: lang/en.json
- Locate the
- Update the text and link as required
- Click on Save & apply file.
6. Home page Blog
The blog section on the homepage displays posts dynamically from your store’s blog. To show content here, you need to add blog posts from the BigCommerce admin panel.
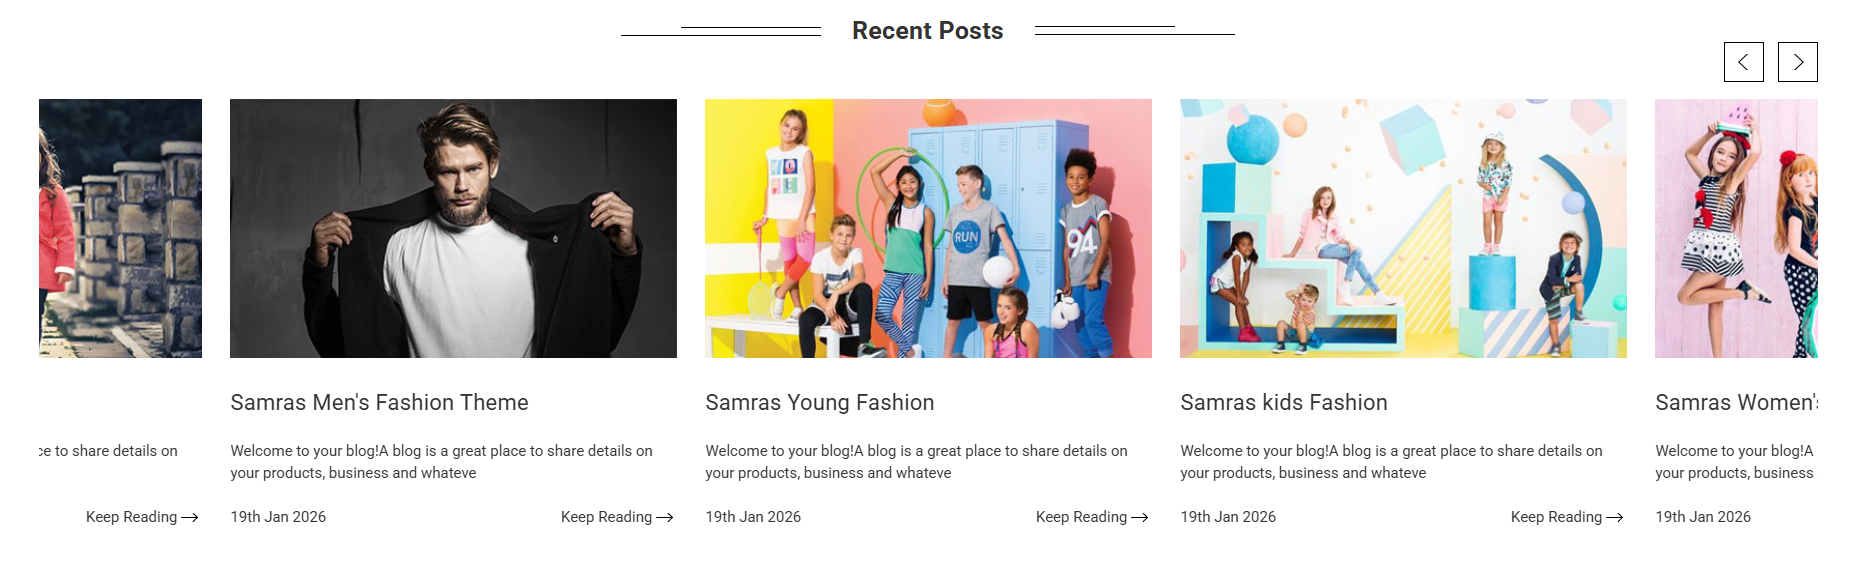

You can also enable or disable the entire blog section from the theme settings.
- Go to Storefront → My Themes.
- Click Customize on the active theme.
- Navigate to the Home Blog section in Theme Styles.
- Enable or disable the section using the display setting.
- Click Publish to apply the changes.
7. Home page Testimonials
The Testimonial section is a static content area where store owners can showcase positive reviews about their brand, products, and services.

You can manage this section by following the steps below.
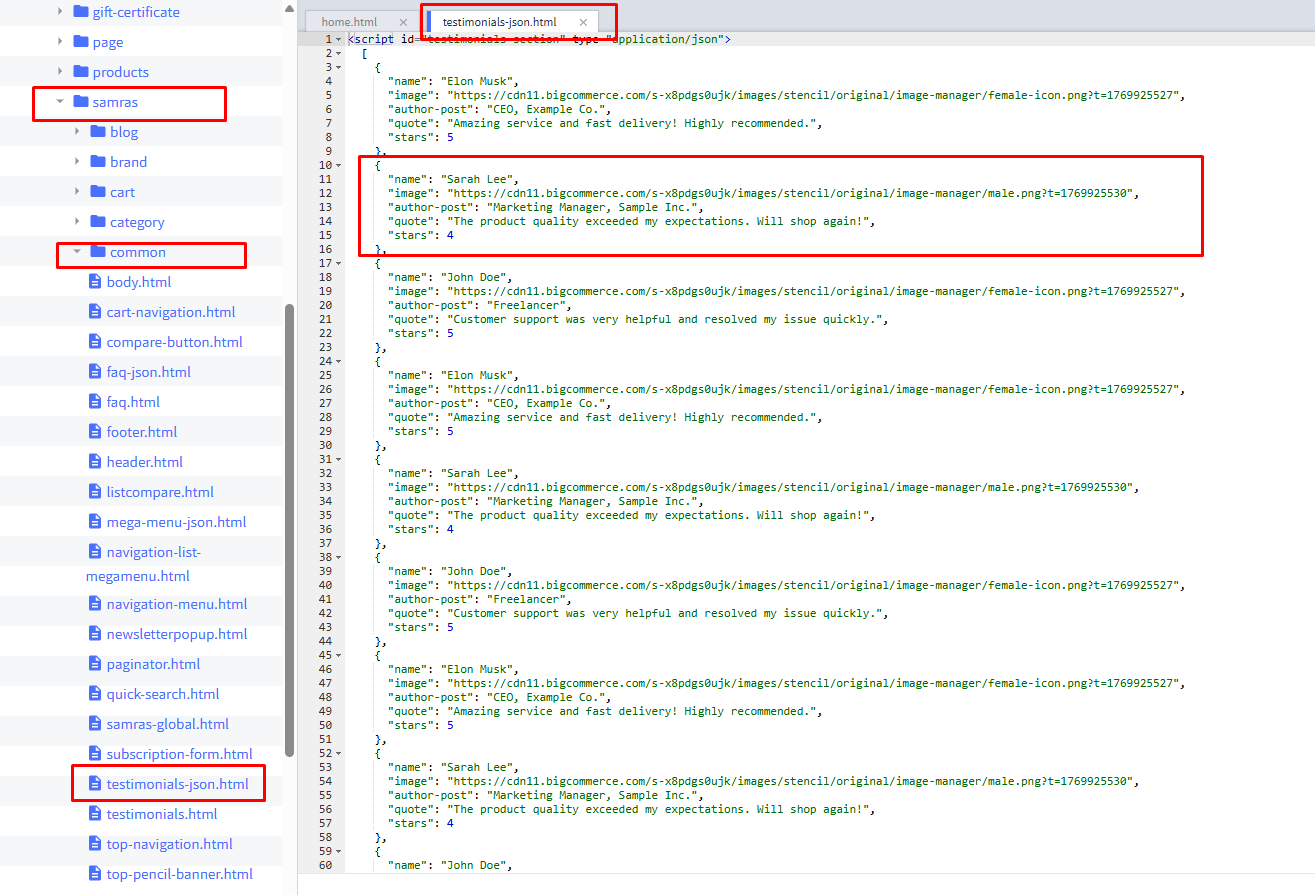
- Go to Storefront → My Themes.
- Click Advanced → Edit Theme Files.
- Open the file located at templates/components/samras/common/testimonials-json.html.
- Add the author name, author image URL, author post, quote, and star in the specified format.
- Click Save & Apply to publish the changes.
Category Page
1. Sub Category Settings
Category page content such as the description, category image, and other details are managed dynamically from the BigCommerce admin.
There is also a theme setting that allows you to enable or disable the sub-category list on the category page. Please follow the steps below to configure this option.

- Go to Storefront → My Themes.
- Click Customize on the active theme.
- Navigate to the Category Page Sub Categories section in Theme Styles.
- Enable or disable the section using the display setting.
- Click Publish to apply the changes.
Brand Page
1. Brand A to Z Filter
The Brand Listing page includes a unique feature that allows brands to be filtered alphabetically (A–Z) in grouped sections. This feature can be managed from the theme settings. If disabled, the page will display the default BigCommerce brand listing layout.
To enable or disable the A to Z filter, please follow the steps below.
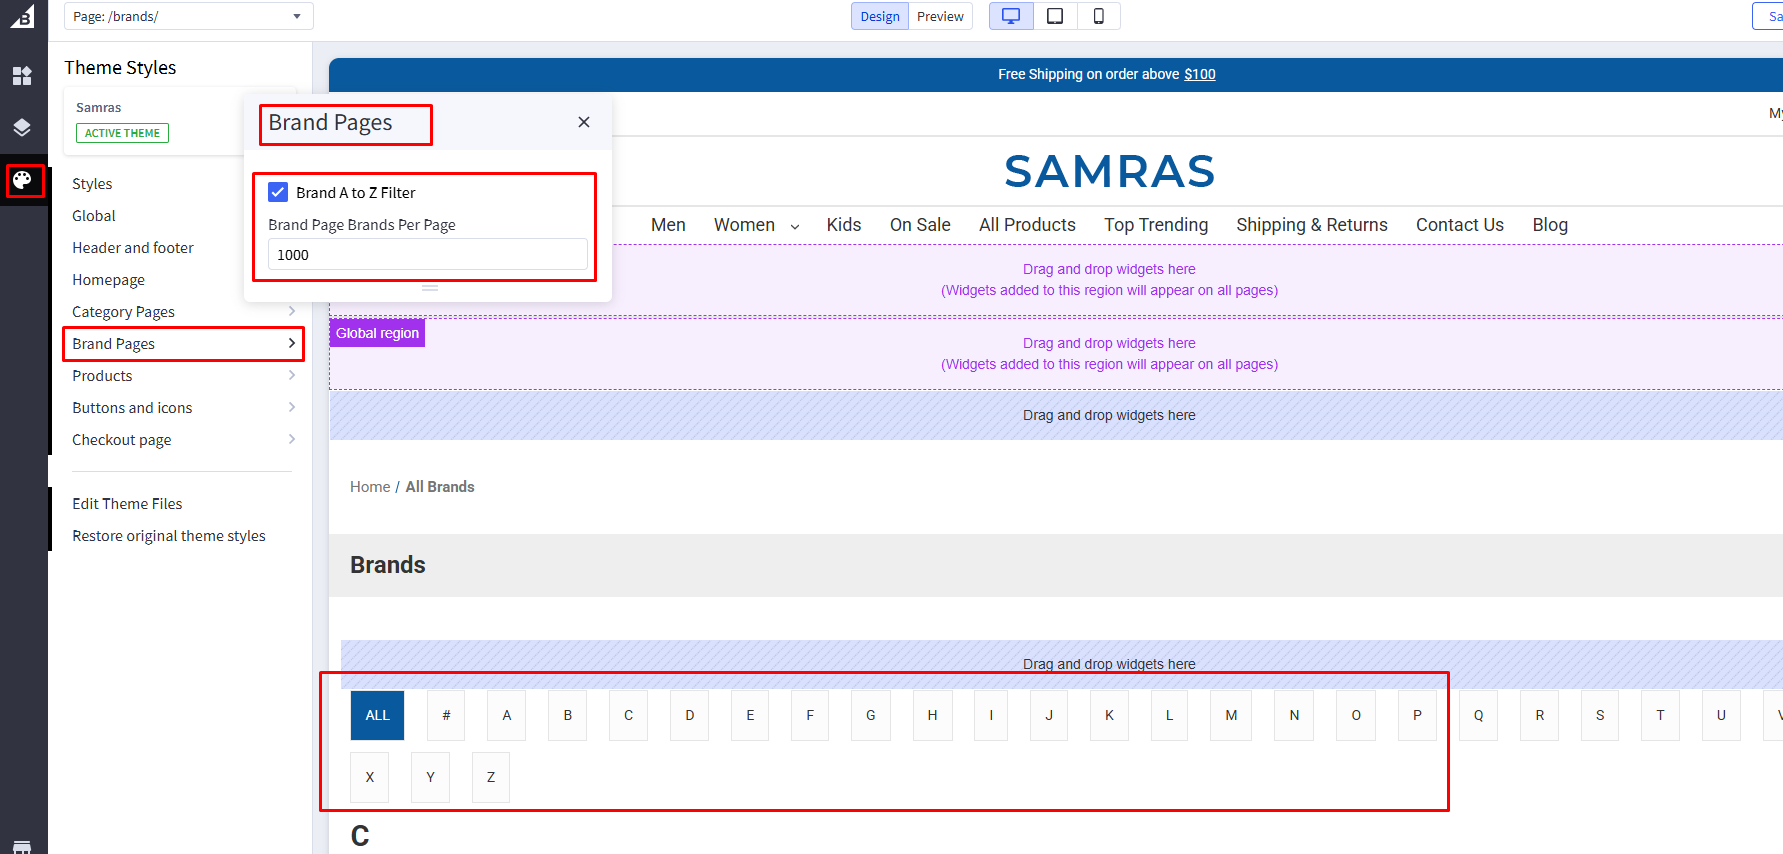
- Go to Storefront → My Themes.
- Click Customize on the active theme.
- Navigate to the Brand Page A to Z Filter section in Theme Styles.
- Enable or disable the section using the display setting.
- Click Publish to apply the changes.
The Brand Details page uses the same layout as the category page.
Product Page
1. FAQ For Home & Product page
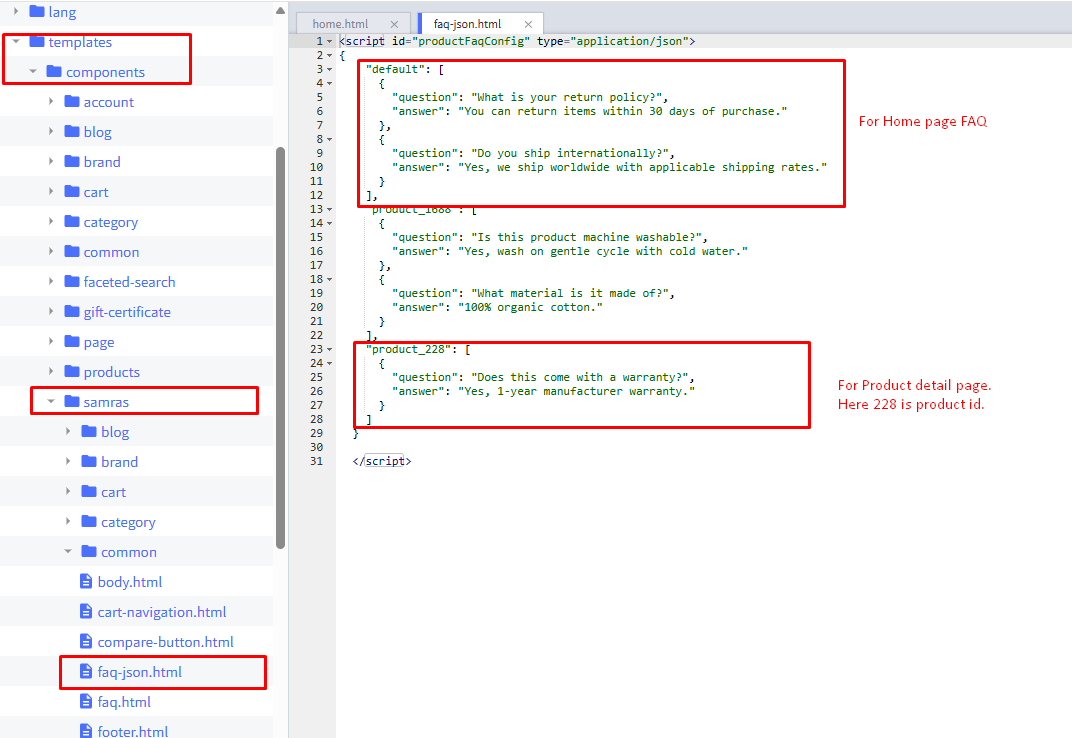
The FAQ feature is a custom section available for both the homepage and individual product pages. This content is managed directly from the theme files.

For product-specific FAQs, you will need to use the Product ID to assign the correct FAQ content to each product.
To find the Product ID, please refer to the image below for guidance.
- Go to Storefront → My Themes.
- Click Advanced → Edit Theme Files.
- Open the file located at templates/components/samras/common/faq-json.html.
- Add the FAQ content using the specified JSON format. The "default" FAQ content will appear on the homepage, while the "product_id('product_123')" entry will display on the selected product pages associated with that Product ID.
- Click Save & Apply to publish the changes.
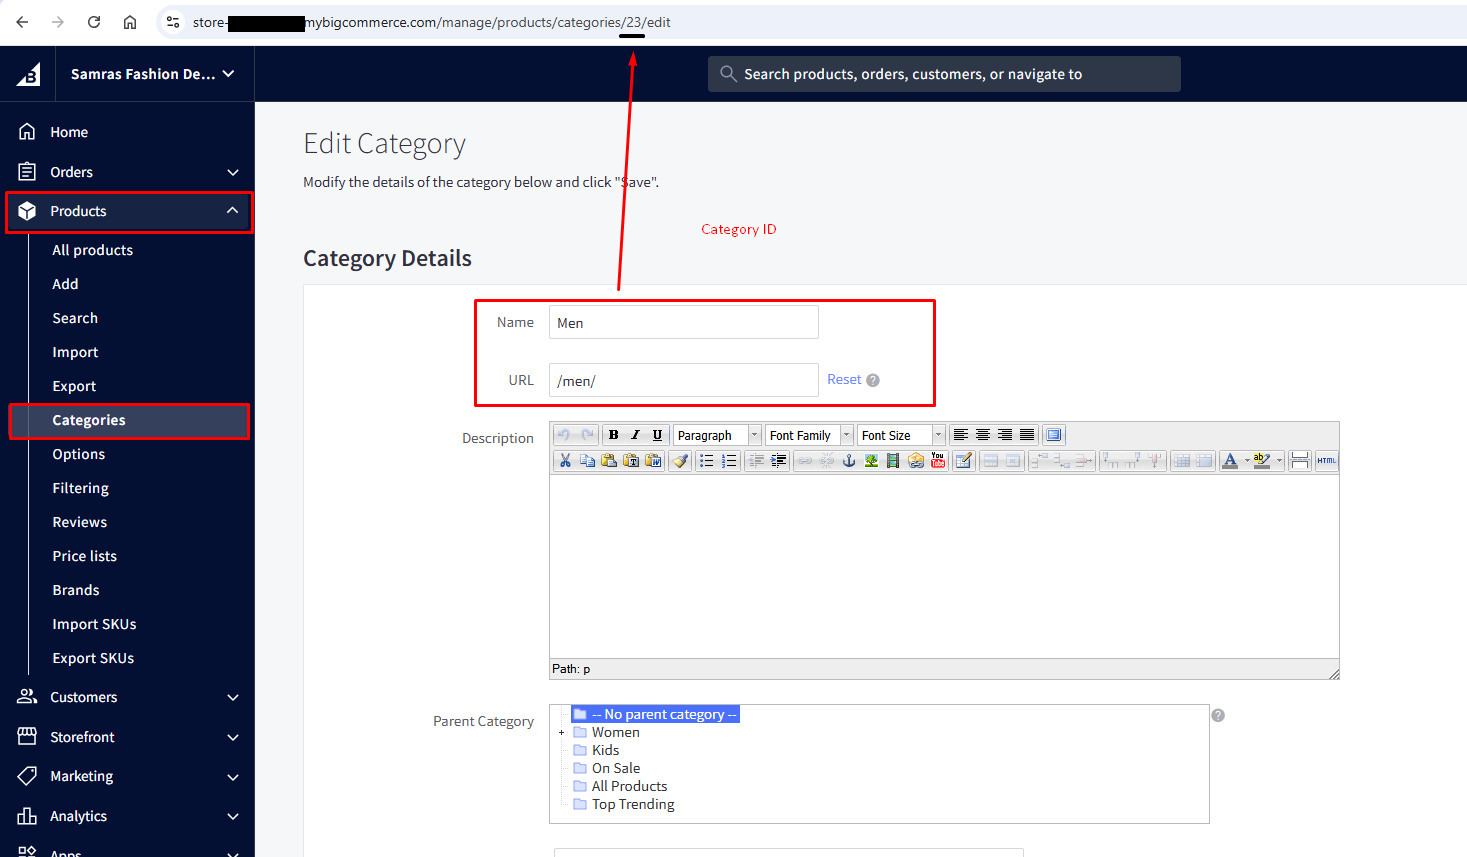
How to get product ID
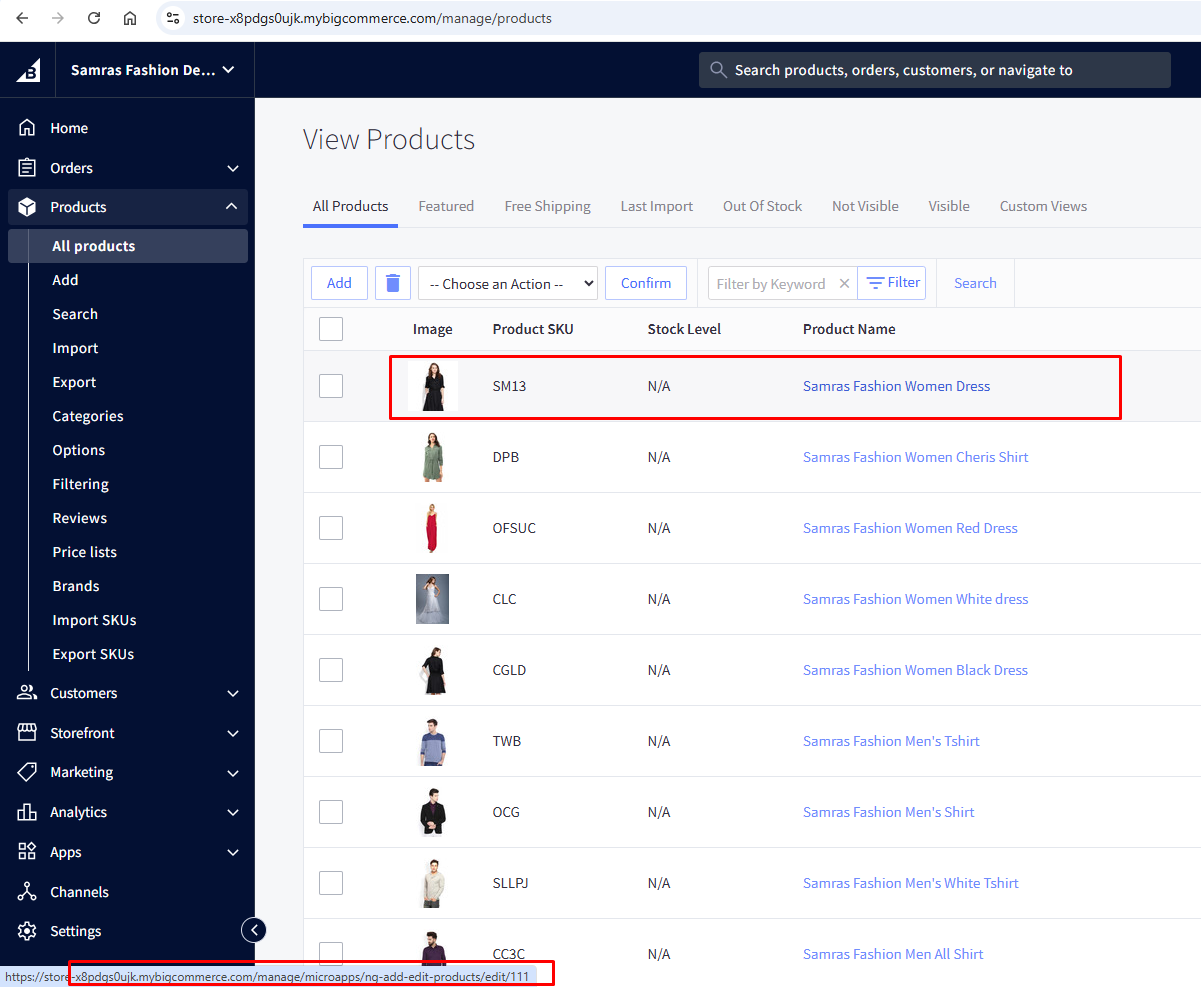
- Log in to your BigCommerce Admin Panel.
- Go to Products → View.
- Click on the product name to open its edit page.
- Look at the URL in your browser’s address bar.
- You will see a number in the URL like …/products/123/edit.
- The number (123 in this example) is the Product ID.
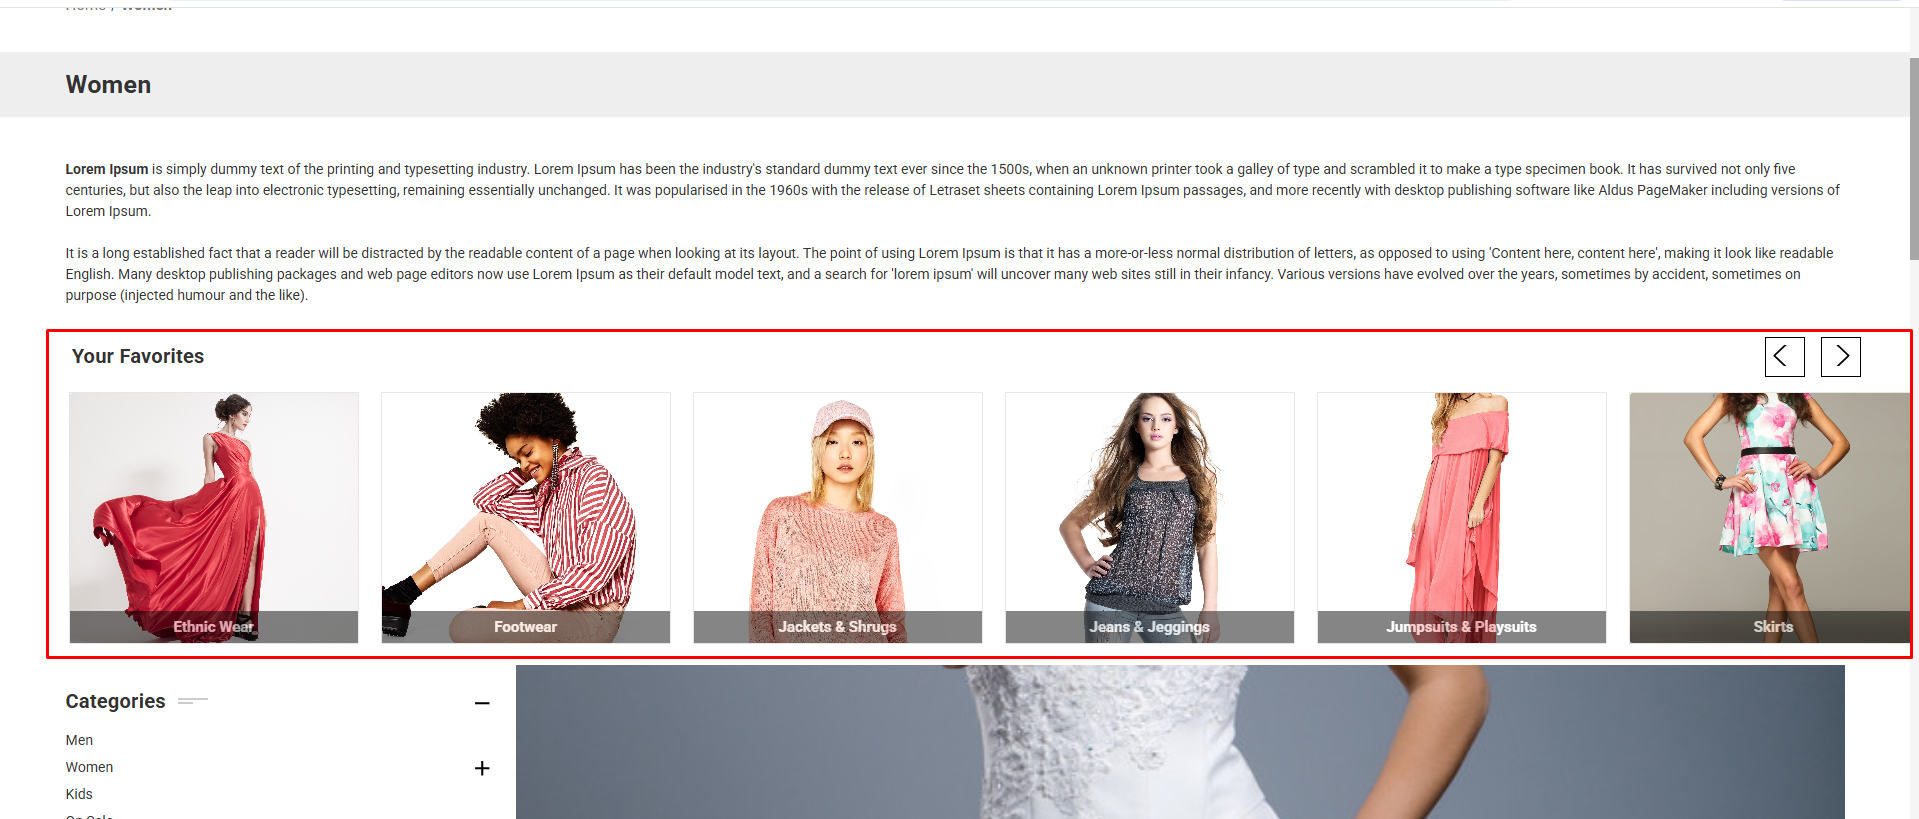
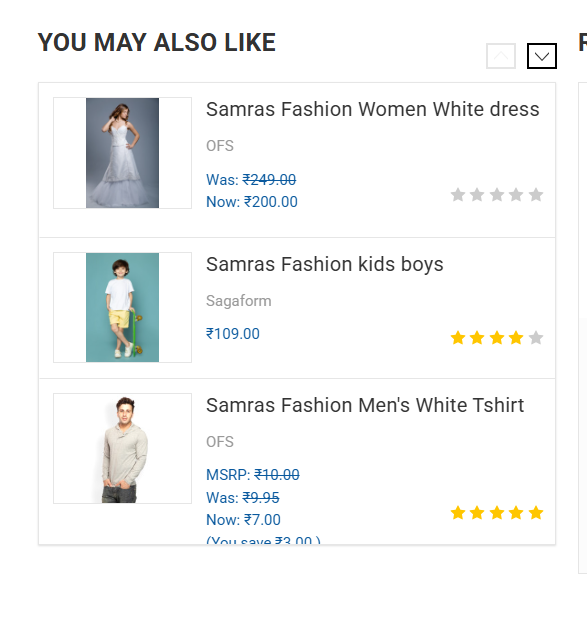
2. Recent View Products
The Recently Viewed Products section displays items that customers have recently browsed in your store. This feature helps shoppers quickly return to products they showed interest in, improving user experience and increasing the chances of conversion.
This section updates automatically based on the customer’s browsing history and does not require manual product selection.
You can enable or disable the Recently Viewed Products section from the theme settings by following the steps below.
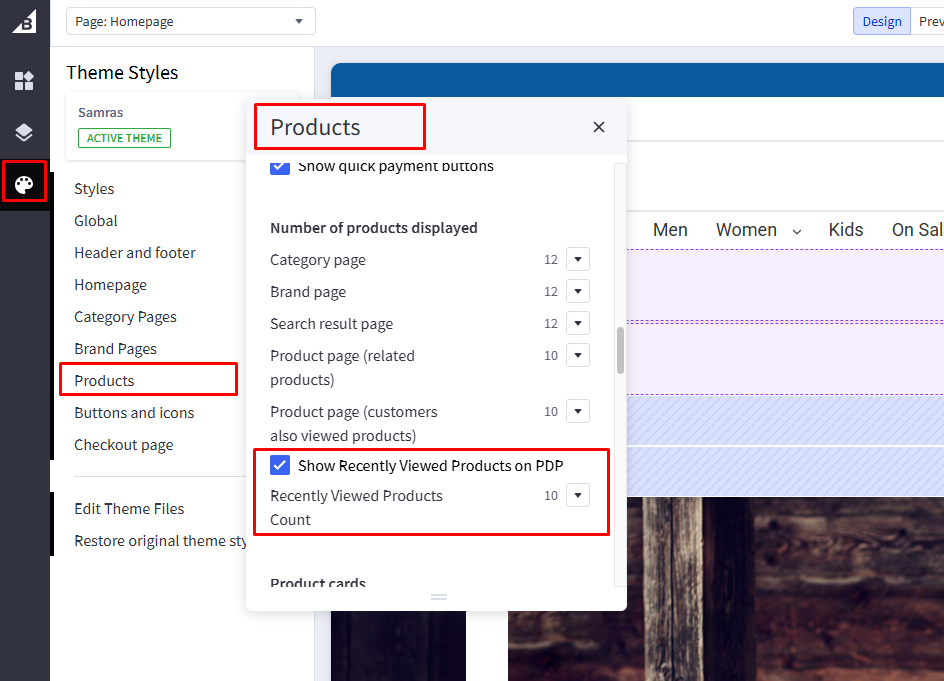
- Go to BigCommerce Admin → Storefront → Themes
- Click Customize on the active theme
- Navigate to Theme Style
- Locate Product "Number of prodeucts displayed" option
- Toggle the setting to Enable or Disable or You can change number to display
- Click publish
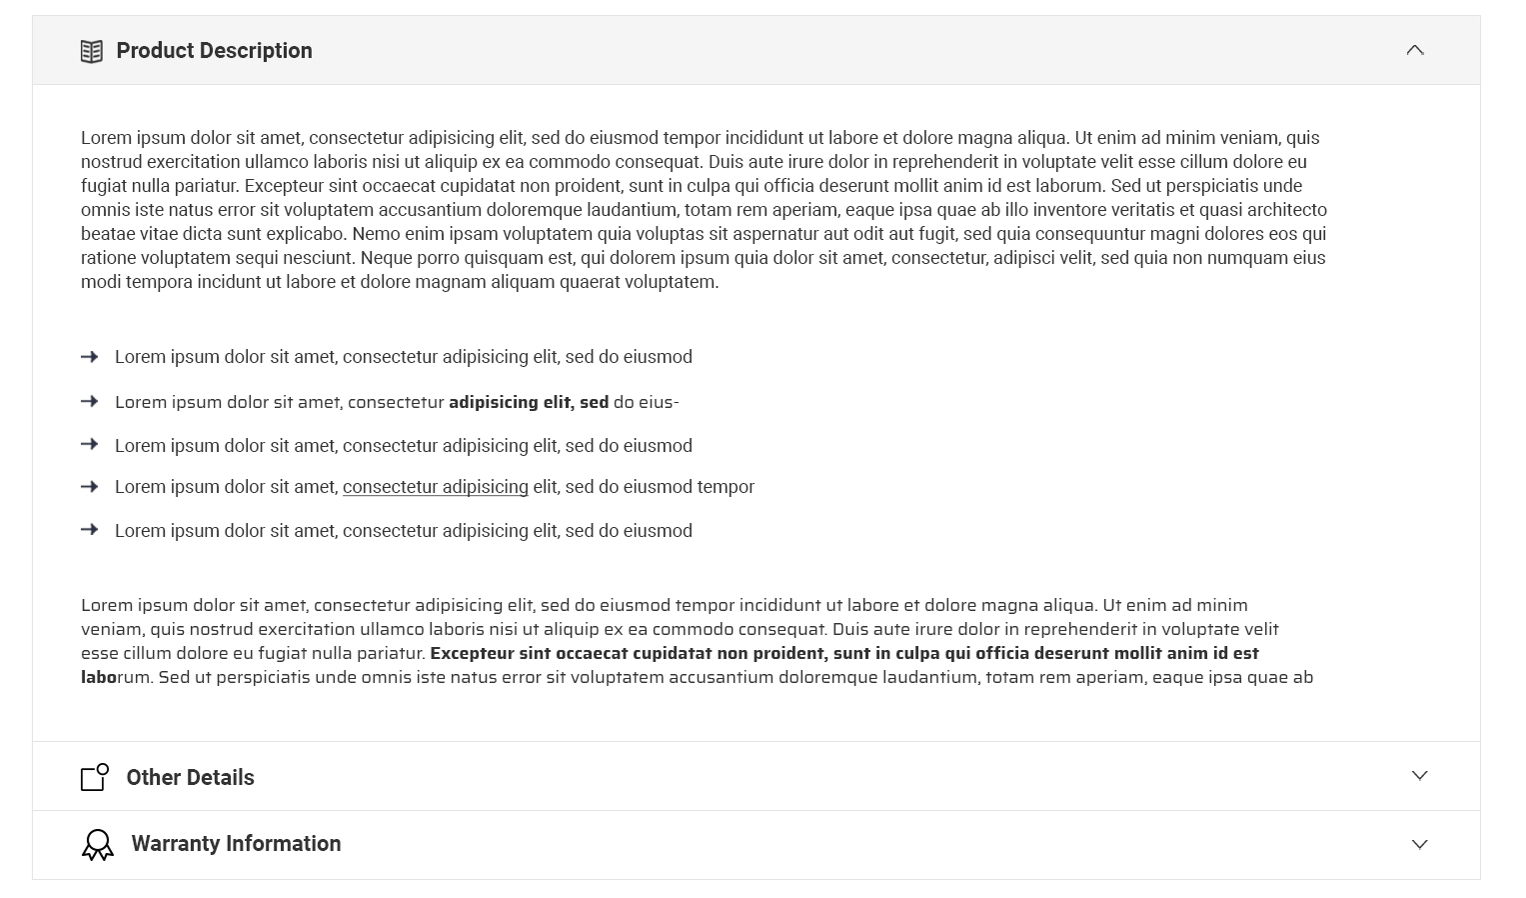
3. Product tabs to accordion
The Product Tabs and Accordion section includes a unique feature. When the tabs are disabled, the layout automatically switches to an accordion style.
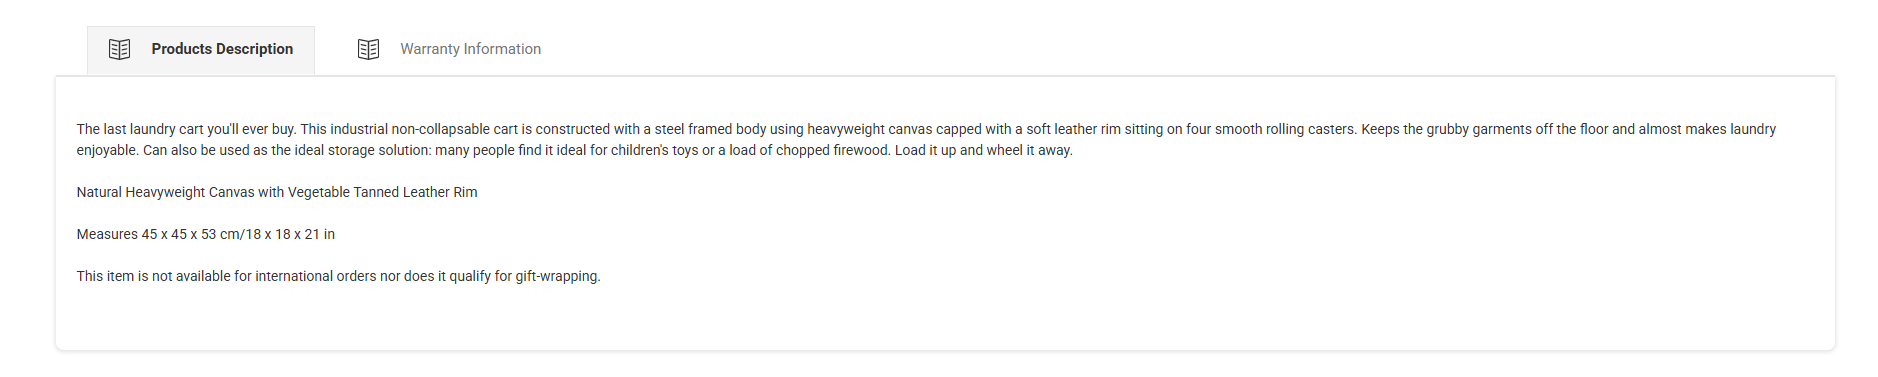
Please follow the steps below to enable or disable this setting.
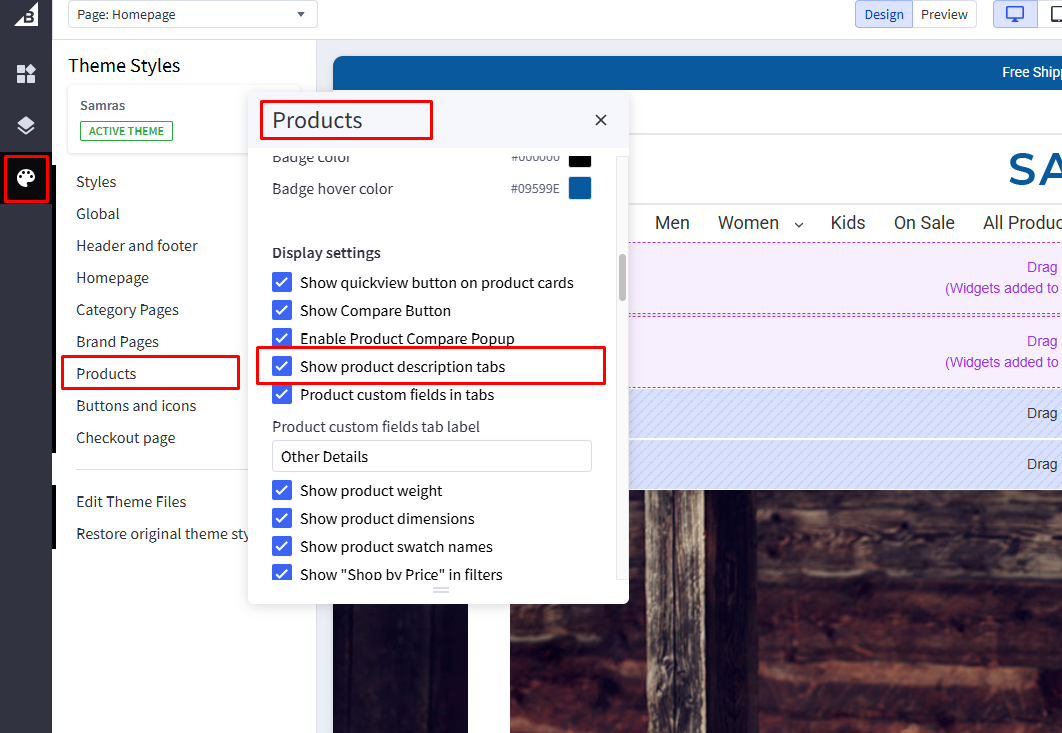
- Go to BigCommerce Admin → Storefront → Themes
- Click Customize on the active theme
- Navigate to Theme Style
- Locate Display settings and "Show product description tabs" option
- Toggle the setting to Enable or Disable or You can change number to display
- Click publish
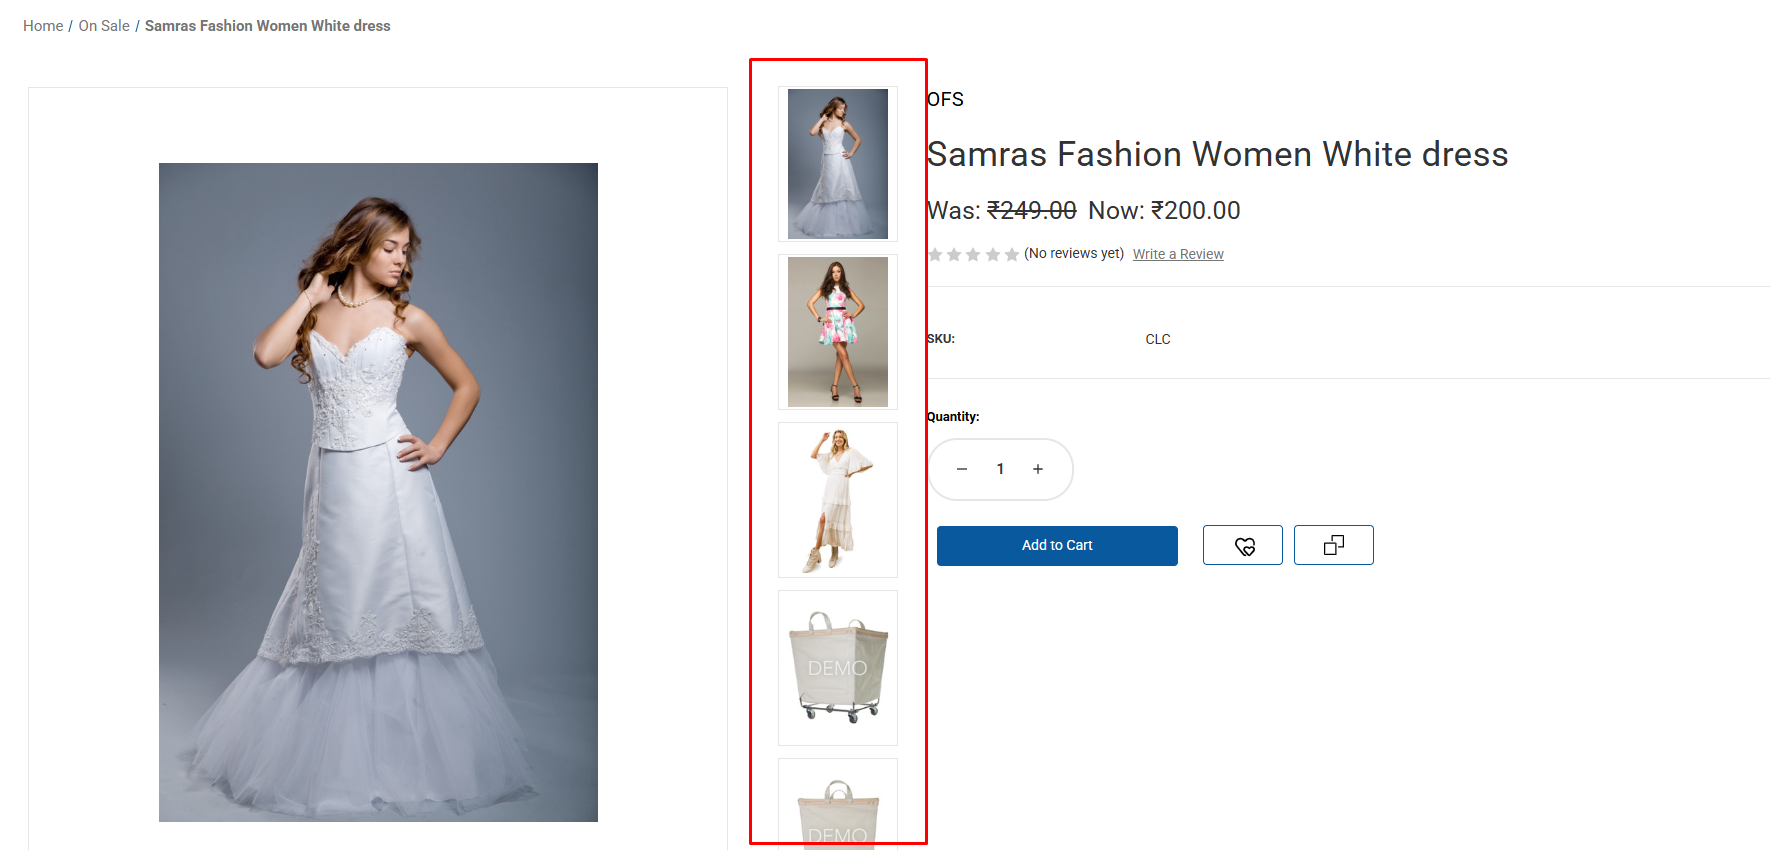
4. Product Thumbnail Positions
Product thumbnails offer three position options: Default, Left, and Right. Changing this setting will update the layout of thumbnails on the product detail page.

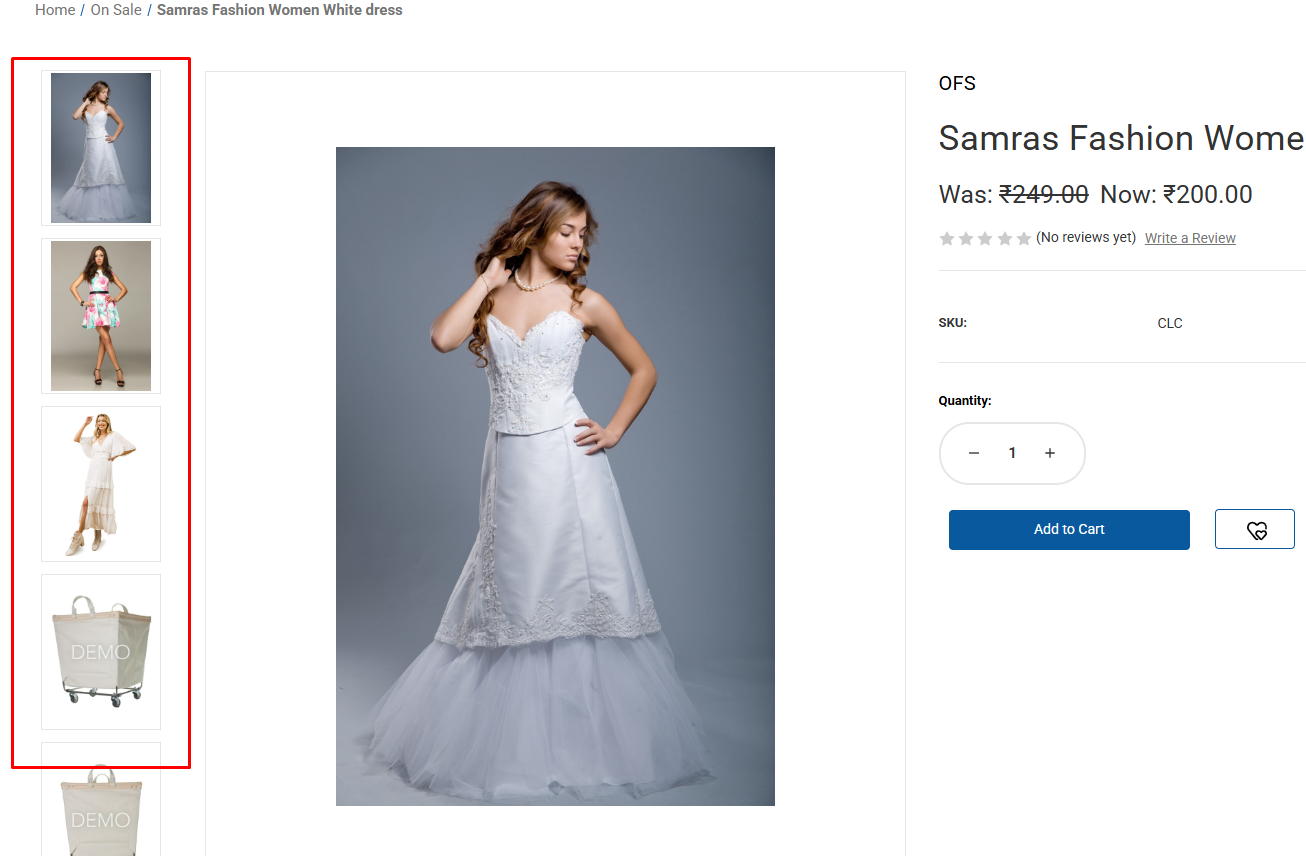
Please follow the steps below to change the layout.
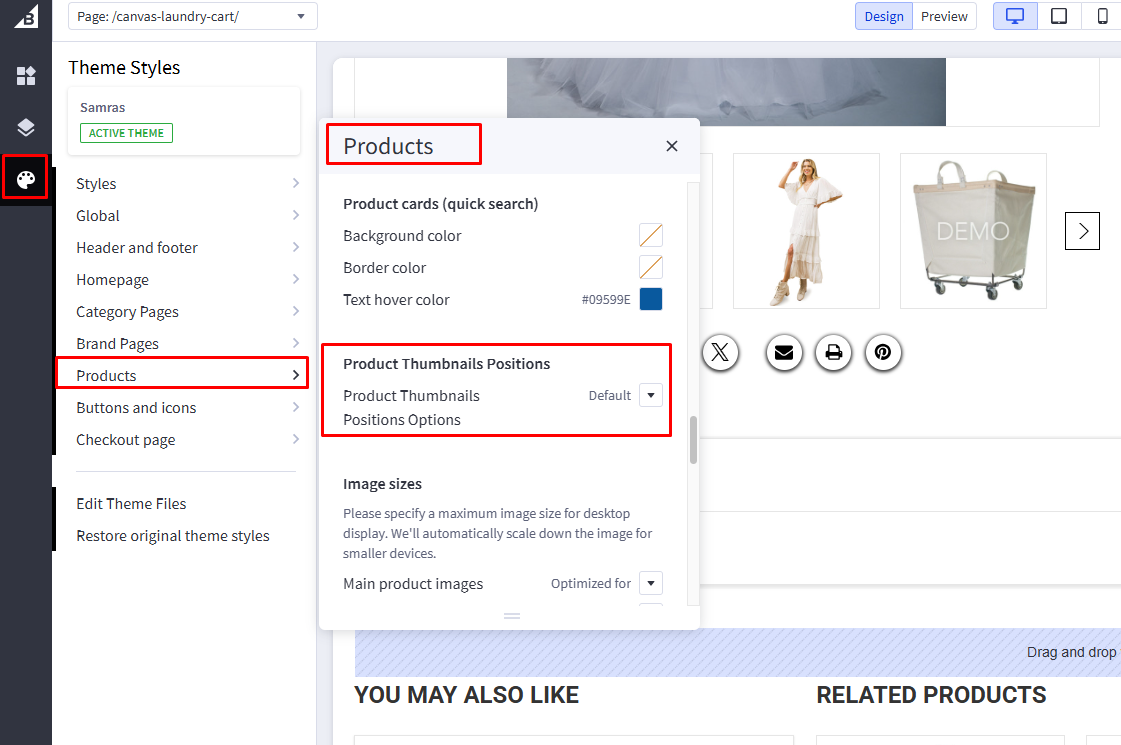
- Go to BigCommerce Admin → Storefront → Themes
- Click Customize on the active theme
- Navigate to Theme Style
- Locate Product Thumbnail Positions setting
- Select the desired position (Default, Left, or Right)
- Click publish
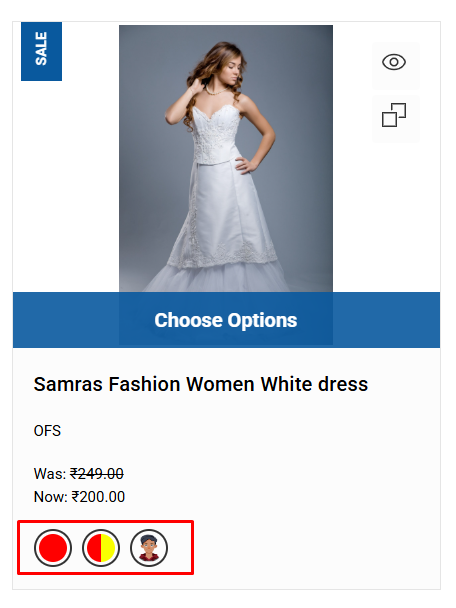
5. Swatches on Product Card
The Product Card Swatches feature allows customers to preview available color or variant options directly from product listing pages, without opening the product detail page. This improves the shopping experience by making product variations more visible and easier to explore.
When enabled, swatches appear on product cards across category pages, brand pages, search results, and featured product sections.
Swatches are generated dynamically based on the variant options (such as color) configured for each product in the BigCommerce admin panel. No additional setup is required beyond creating variant options for your products.
You can enable or disable Product Card Swatches from the theme settings by following the steps below.
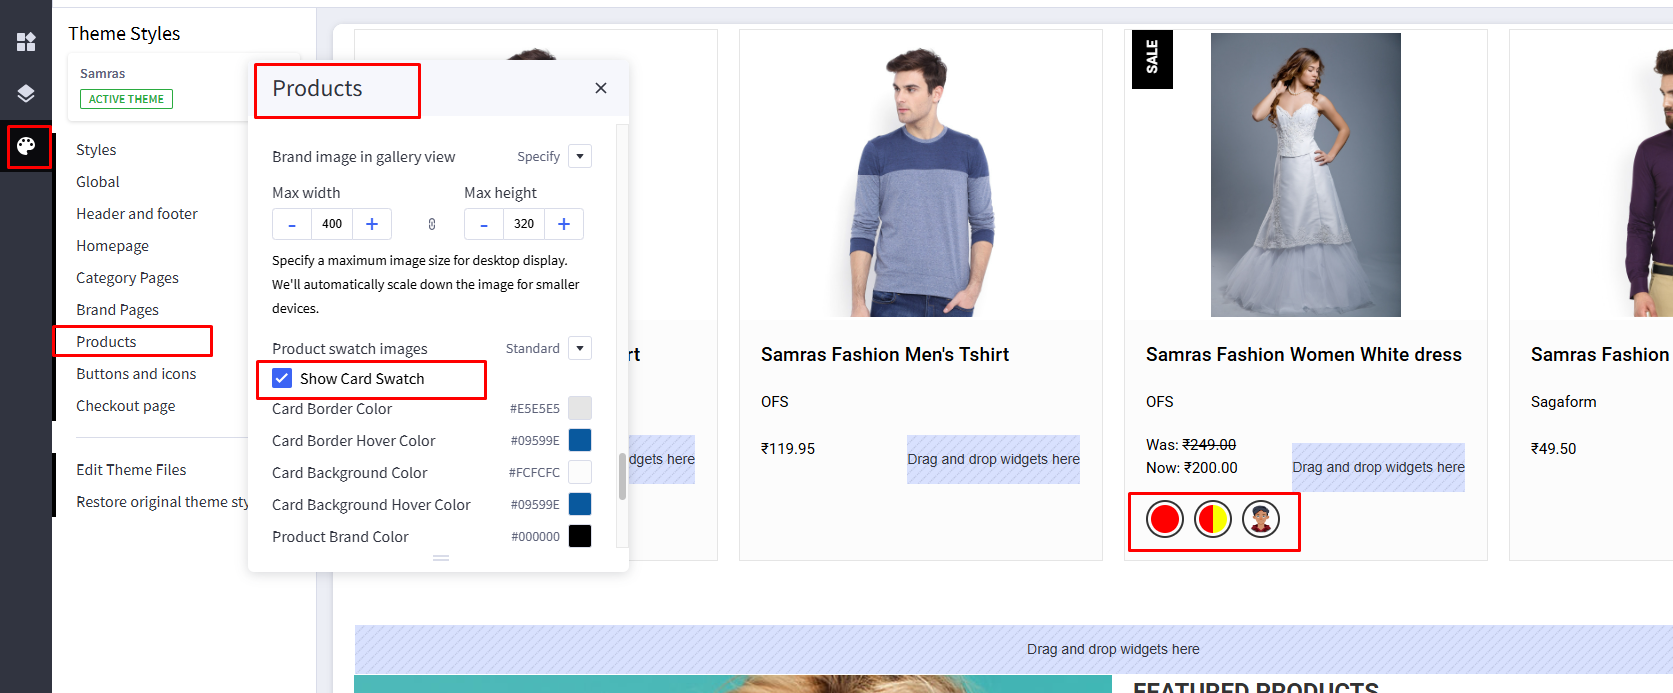
- Go to BigCommerce Admin → Storefront → Themes
- Click Customize on the active theme
- Navigate to Theme Style
- Locate Products and Show card swatch setting
- Toggle the setting to Enable or Disable
- Click publish
Other Pages & Sections
1. Other Pages and settings
The Samras theme is built on the BigCommerce Cornerstone framework, so many features and settings follow the default Cornerstone and BigCommerce behavior.
For any feature not specifically customized in the Samras theme, you can refer to the official Cornerstone Theme documentation and BigCommerce Help Center, as those features will work according to the default platform behavior.
Unique Features
1. Show Modal Popup
The theme includes a unique feature that allows you to control the position of modal popups. You can set modal popups to appear on the left, right, or in the default center position using the available theme settings.
Below are screenshots for reference, along with the steps to change this setting.
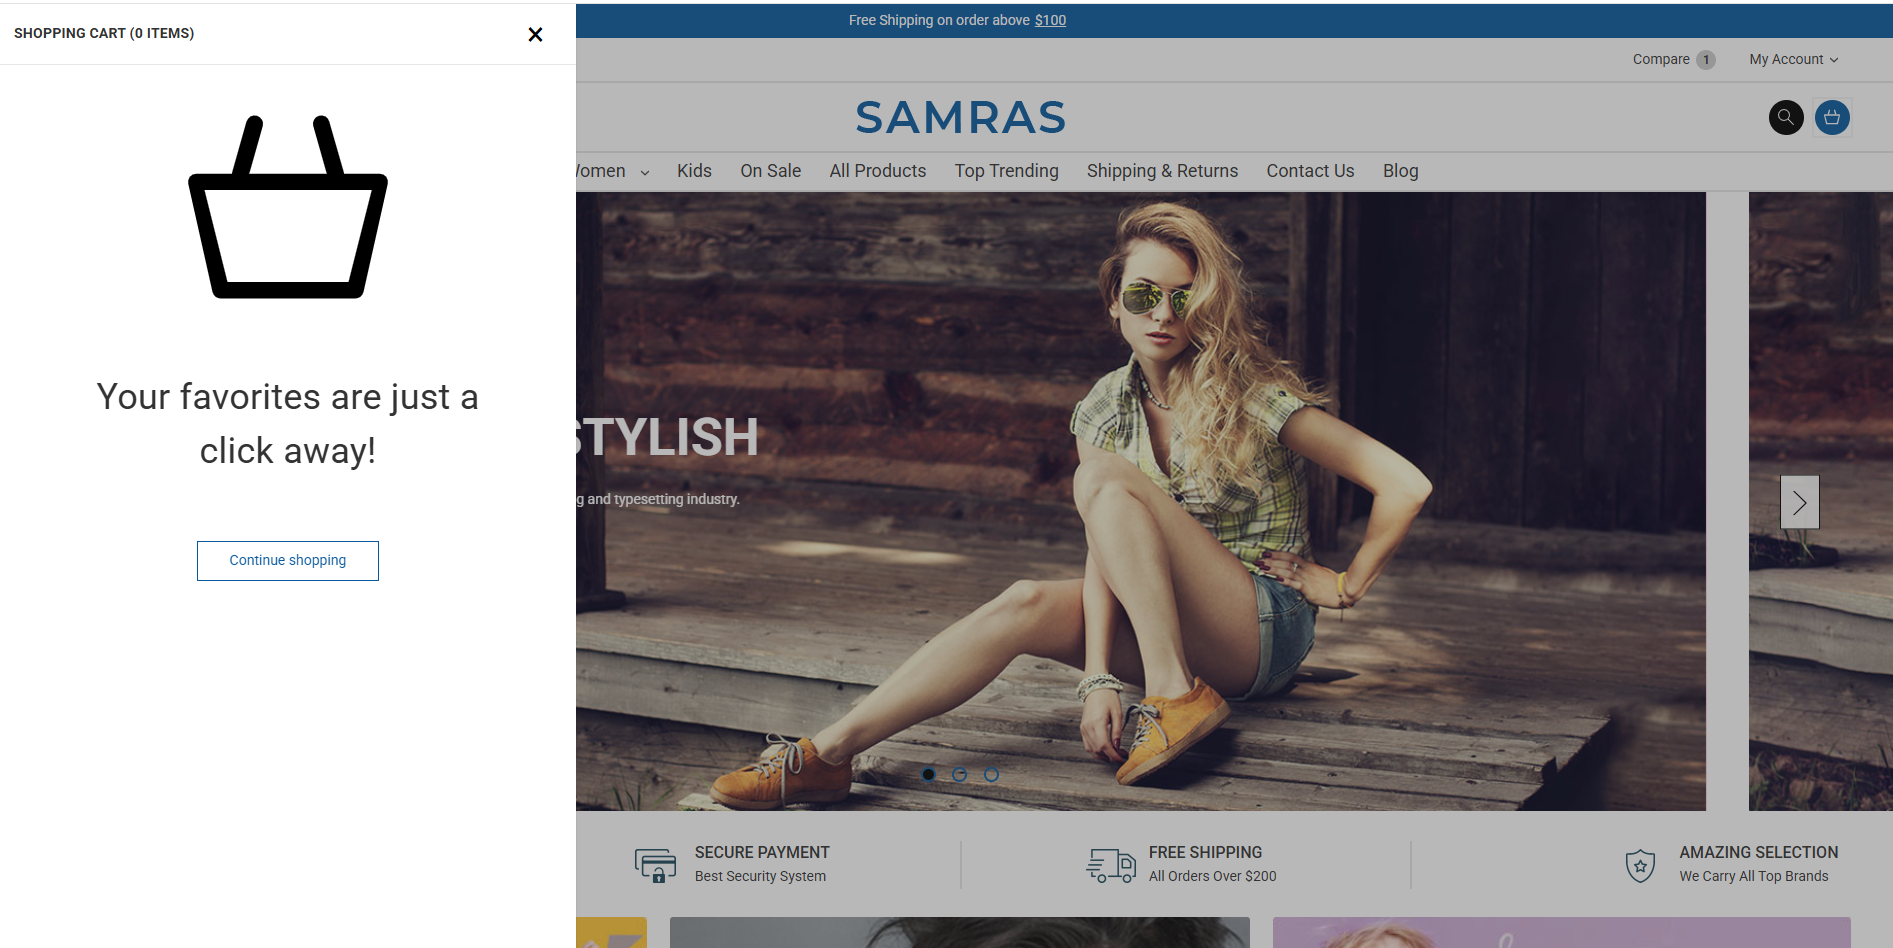
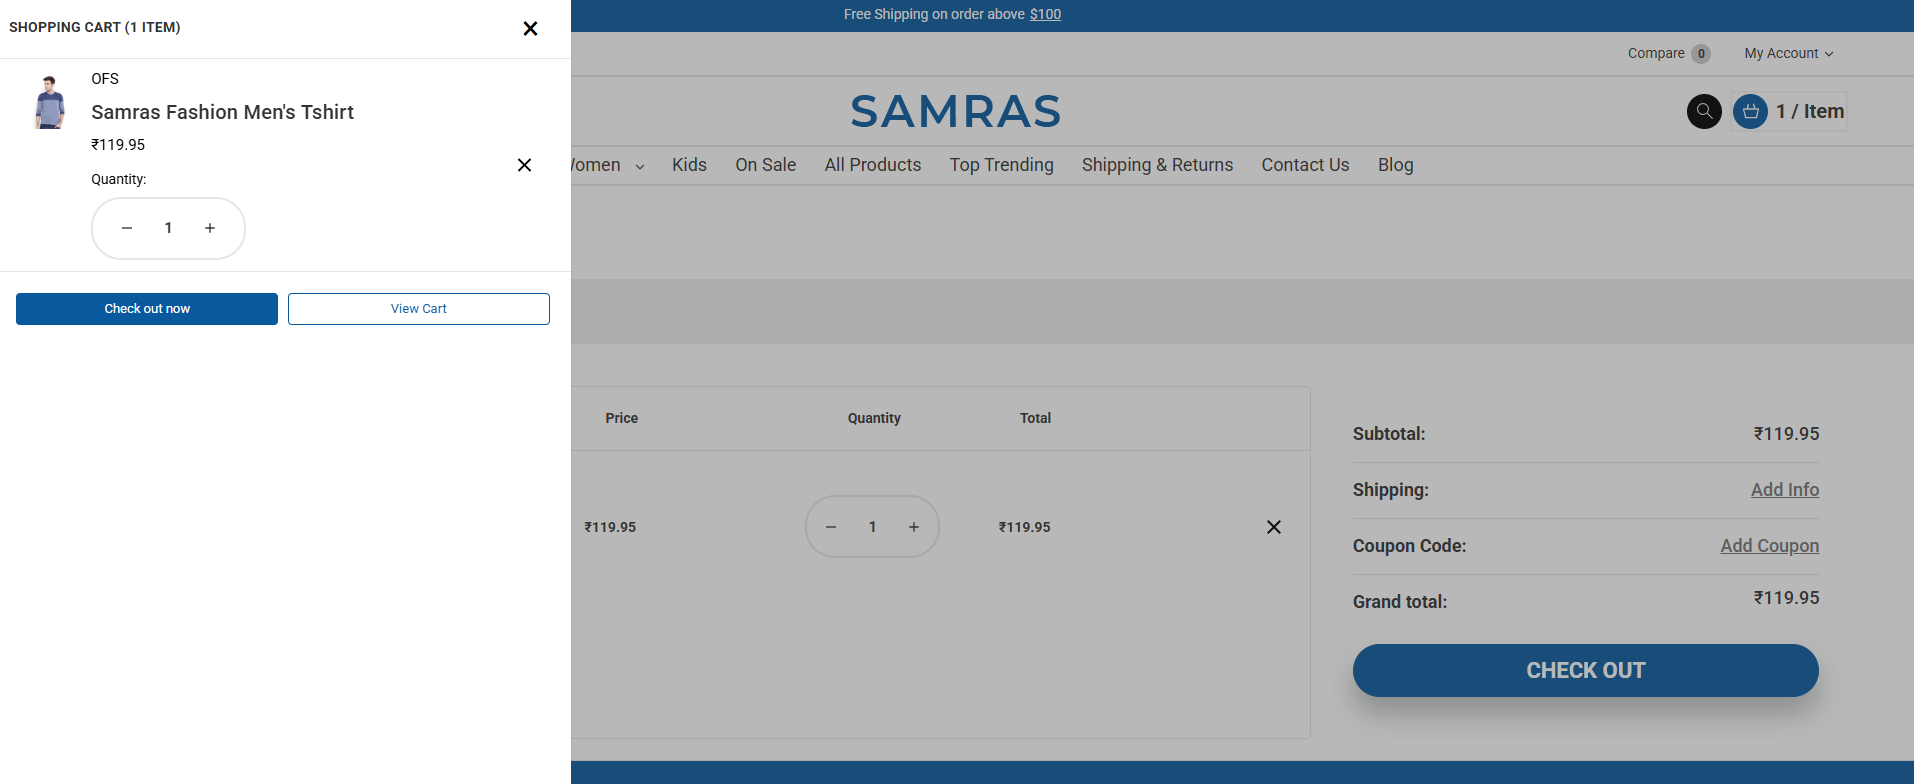

The images shown are for reference of the left-side layout. You can manage and change this setting from the theme settings.
- Go to BigCommerce Admin → Storefront → Themes
- Click Customize on the active theme
- Navigate to Theme Style
- Locate category pages → Show Modal Popup
- Select the desired Modal popup position (Left, default, or Right)
- Click publish
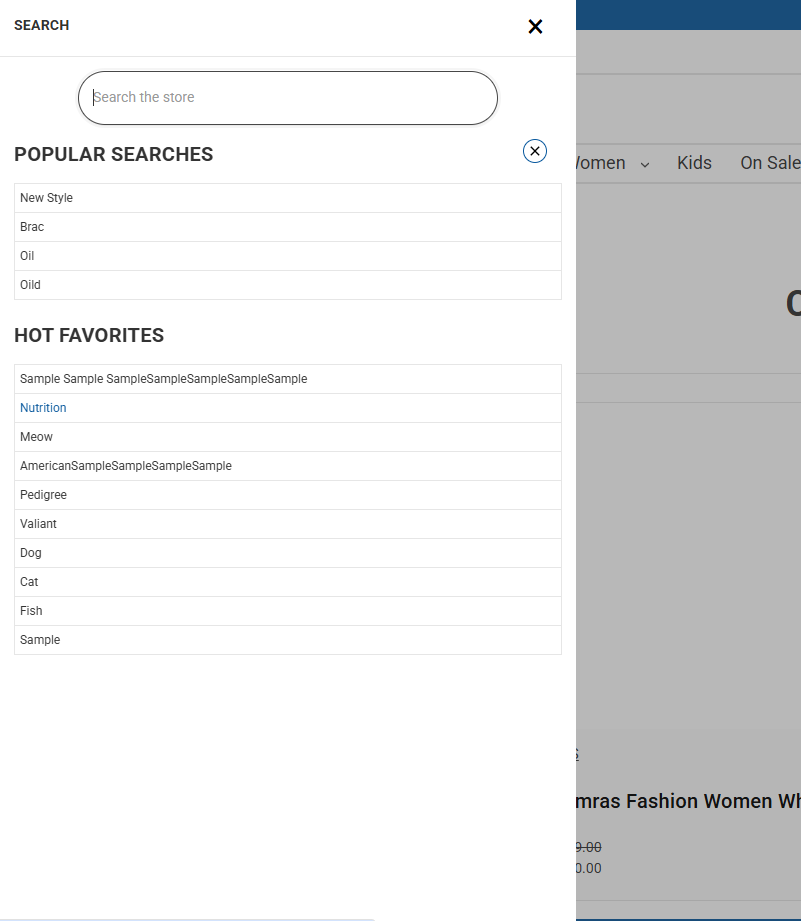
2. Header Search
The header search stores the customer’s recent search history in their browser for quick access. You can also configure popular products to be displayed in the search dropdown.
Please follow the steps below to set up popular products.
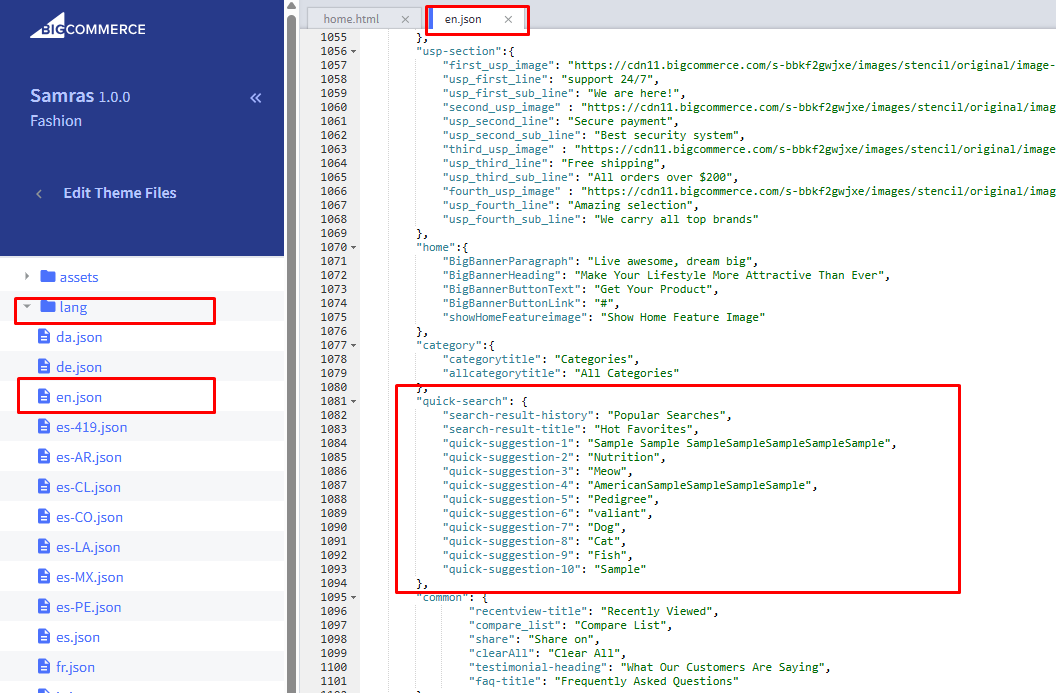
- Go to Storefront → My Themes
- Click Advanced → Edit Theme Files
- Open the language file: lang/en.json
- Locate the Quick search
- Update the text as required
- Click on Save & apply file.
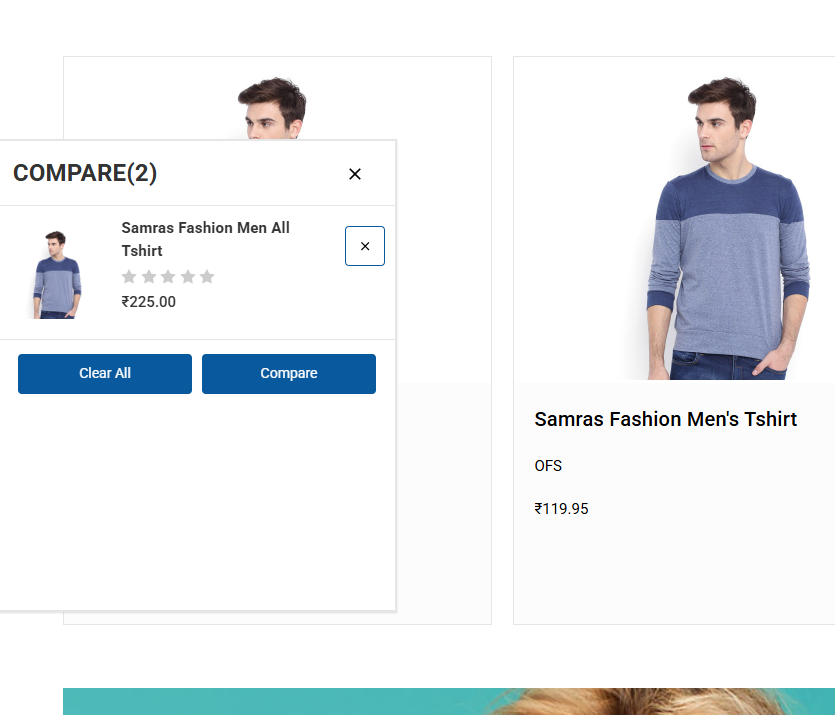
3. Compare Products
The Compare feature is a unique functionality that allows customers to compare products easily. Products can be added to the comparison list from both the product card and the product detail page.
After selecting products to compare, a compare popup appears, providing a quick preview of the selected items. From this popup, customers can navigate to the full Compare Page to view detailed comparisons.
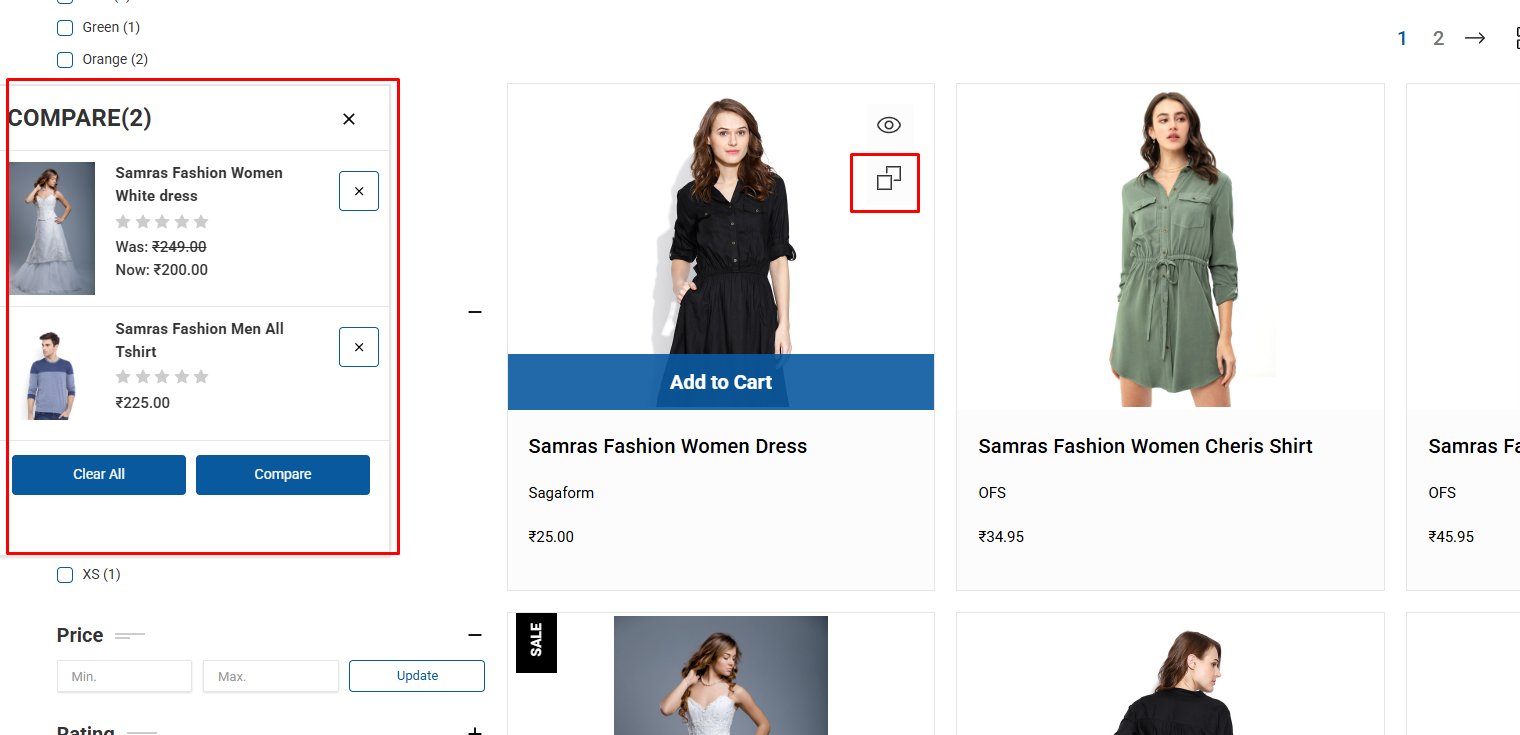
Please follow the steps below to enable/disable the compare button or compare popup.
- Go to BigCommerce Admin → Storefront → Themes
- Click Customize on the active theme
- Navigate to Theme Style
- Locate products and display settings
- Toggle the show compare button and Enable Product Compare Popup setting to Enable or Disable
- Click publish
4. Page Heading Background
The theme allows you to customize the background color of the page heading through the theme settings.

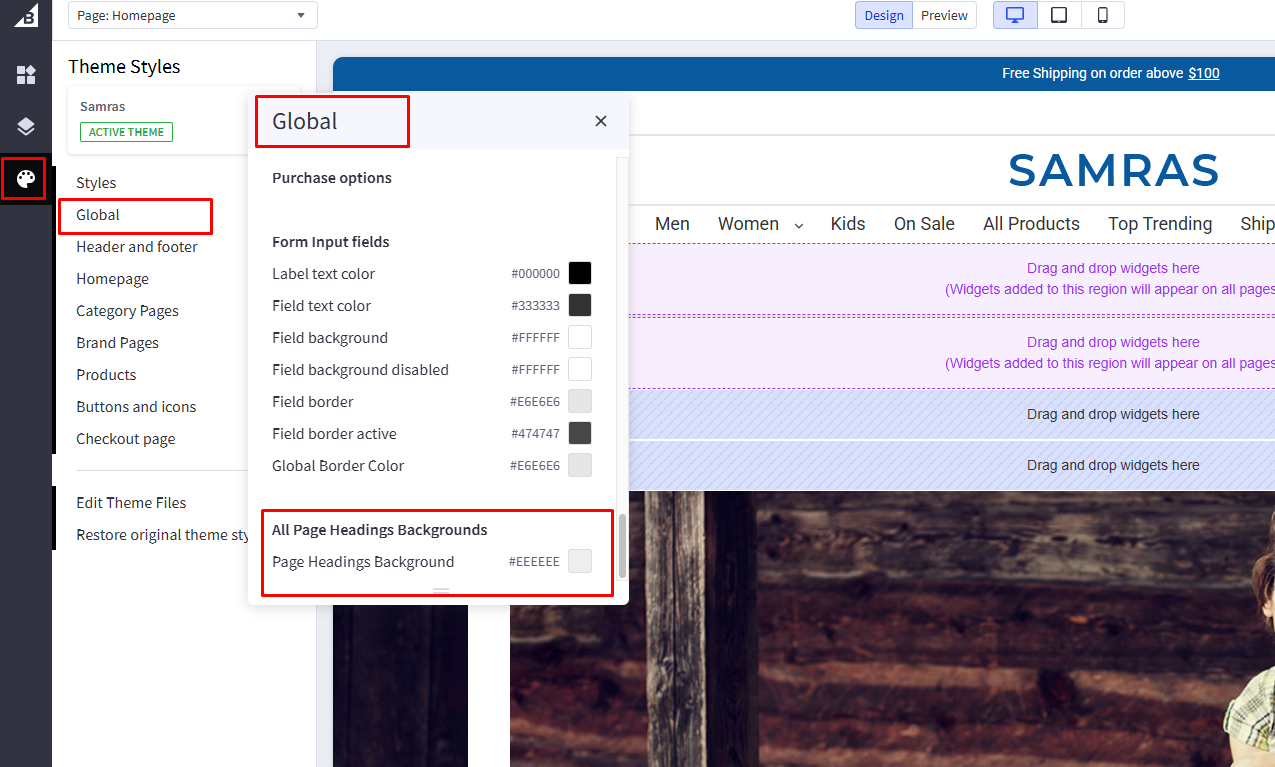
- Go to BigCommerce Admin → Storefront → Themes
- Click Customize on the active theme
- Navigate to Theme Style
- Locate Global
- Toggle to change page heading background
- Click publish
Release notes & Changelog
Currently, there are no release notes or recent updates for the theme. However, if you encounter any issues, we encourage you to share them with us — we’ll be happy to help.
If you are interested in developing a custom theme tailored specifically for your store, our team would be glad to assist you.